- Author admin caroline@plants-knowledge.com.
- Public 2023-12-17 03:39.
- Last modified 2025-06-01 06:48.
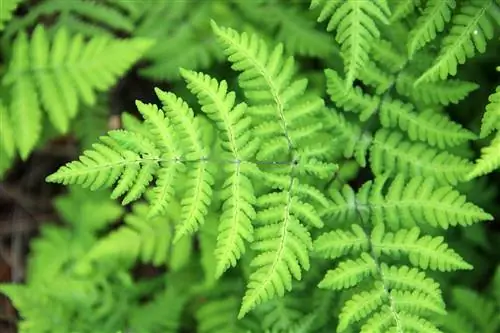
Ferns do not require a green thumb, as they are considered very undemanding and easy to care for. Nevertheless, certain factors should be taken into account when caring for the plant so that it grows and thrives extensively.
Location
In the wild, ferns grow primarily in the tropics and subtropics, but can also be found in cooler areas. In general, however, it can be said that they prefer to grow where it doesn't get too hot and dry. Basically, they prefer shady places, such as in the shade of trees and bushes. Accordingly, they are particularly suitable for locations in the home garden where there is little or no direct sunlight.
- Shadows from walls
- Courtyards
- Under the trees
- Wall joints
- Rock gardens
Soil/Substrate
A substrate that occurs naturally in the forest is best suited for ferns. This can be imitated with a layer of litter by simply leaving the autumn leaves lying around. The mulch layer also has two advantages: it provides natural winter protection and at the same time improves the soil. The best conditions are also provided by a surface with the following properties:
- Humus-rich
- As permeable as possible
- Loose
Planting
Planting ferns is generally possible throughout the entire growing season, although it has proven useful to plant the plants in spring. Sensitive species in particular benefit from this time, as it ensures that they have sufficiently rooted themselves by winter. Planting itself is easy and is as follows:
- Dip fern in bucket of water before planting
- Until no more bubbles appear
- Dig up planting hole
- Fern should sit deeper in the ground than before in the pot
- Press the soil well
- Pouring
- If necessary, cover with bark mulch or leaves
Fertilize

Fertilizing ferns is not absolutely necessary, but the undemanding plants enjoy an extra portion of nutrients during the growth phase. Hobby gardeners can therefore fertilize the plants every two weeks from spring to autumn.
- Fertilizer should not be too concentrated
- It's best to only use ½ of the recommended amount
- Especially when using conventional flower fertilizer!
- Alternatively use special fern fertilizer
Note:
Instead of regular fertilization, a one-off application of compost is also recommended.
Pouring
A bit of sensitivity is required when it comes to the water supply, because the fern likes it moist, but not too wet. You can usually tell whether it has been watered too much by looking at the leaves, as they will develop brown edges or spots. To ensure a regular water supply and to prevent the root ball from drying out, it is worth laying out a layer of mulch. This also has the advantage that the fern in the garden needs to be watered less often. The following points should also be taken into account when watering:
- Water preferably with low-lime water
- Rainwater is best
- Alternatively, decalcified tap water is also available
- Avoid waterlogging
- Root ball should not dry out
Since ferns like high humidity, it is worth spraying the plants with water every now and then.
Cutting
In spring only dead fronds remain from the fern, which is why the plant is best cut off close to the ground at this time. The practical thing is that cutting also creates space for fresh shoots. Deciduous species can also be freed from the dried fronds in autumn, although it is also advisable to wait until spring before cutting these specimens. The cut fronds do not have to be thrown away because they can serve you well in the garden!
- Put cut fronds into shredder
- Mix with mature compost
- Sprinkle mixture around the plants
- Mulch layer protects against drying out and provides nutrients
Wintering
Ferns are generally hardy and shield ferns are even wintergreen. Accordingly, it is generally not necessary to additionally equip them with winter protection. The only exception are those specimens with a trunk - i.e. those specimens that form a rhizome above ground. Although these species can cope with temperatures of up to -12 degrees Celsius, they should be protected from frost as a precaution:
- Shorten the fronds or tie them together
- Cover the trunk with a straw mat
- Cover the root area with leaves and brushwood
Propagate
There are several options for propagating ferns, as they can be propagated using cuttings, spores or division. Ferns are so-called “vascular spore plants” and do not form seeds, but rather spores. These are found on the underside of the leaves and can visually resemble brown pustules.
Spores
So-called “pre-germs” develop from the spores on the underside of the leaf, which ideally are later fertilized. If fertilization is successful, new fern plants will form. In order to multiply the fern using spores, you must first wait until they are ripe. This can be recognized by the fact that fine dust becomes noticeable when touching the leaves. If this is the case, propagation can be carried out as follows:
- Separate the fronds and place them on a piece of paper
- Place in a warm place
- After about two days, a lot of spores should have fallen down
- Remaining spores can be swirled out by shaking the frond
- Place spores in a container with moist soil
- Cover container with plastic wrap
- Place in a warm but not sunny place
- Germination after about 3 months
Cuttings
The easy-care fern can also be propagated using cuttings by first cutting off a few top cuttings. It is best to choose head cuttings that have already formed a small fern. The cuttings are then placed in a planter with moist soil and cared for as follows:
- Cover planter with plastic wrap
- Remove the film several times a day to ensure ventilation
- Place the vessel in a warm and bright place
- Root formation after a few weeks
- Prick out as soon as 2 - 3 small fronds are present
- Continue to ensure high humidity and constant temperatures
Division
While propagation via spores or cuttings is certainly possible, propagation by division has proven successful among hobby gardeners. Ferns with branched rhizomes are simply divided as follows:
- Small ones: cut off hand-sized pieces with at least 2 shoot buds in spring
- Large: expose rhizome in early spring
- Pick off several pieces with at least one shoot bud
- Place pieces in pots with low-nutrient potting soil
- Keep soil moist
- Overwinter the container in a cool and frost-free area
- Planting possible in spring
Pests
Ferns are considered very easy to care for, but they can still be plagued by pests. Spider mites, aphids and fungus gnats in particular can cause problems for the plant. They are also often attacked by rootworm caterpillars, which eat into the roots and cause the plants to fall over sooner or later. In order to prevent the pests from spreading to other plants, an infestation should be combated in good time. To do this, it is worth removing infected fronds and treating the affected plants with a combination of soft soap and alcohol.

