- Author admin [email protected].
- Public 2023-12-17 03:39.
- Last modified 2025-06-01 06:48.
For many people, using their own terrace is simply part of using their garden from spring to autumn. But while the sun is generally welcome, too much can quickly ruin your enjoyment of being outside. Parasols can help. These find a secure hold in ground sockets. You can find out how to properly set these ground anchors in concrete in our step-by-step instructions.
Step by step to the concrete ground anchor
Just as there is no one parasol, there is of course no one universal method for encasing the umbrella stand in concrete. While the screen size primarily affects the required foundation size, the design of the screen holder has a significant influence on how the connection between the foundation and the screen looks.
1. The vertical clamping
The common way of adjusting the parasol rod into a prepared sleeve is well known. From a static point of view, the power is transmitted through a so-called clamping, i.e. essentially over the length of the umbrella shaft located in the sleeve. While temporary ground anchors can be driven in or screwed in, permanent ground anchors have a tubular sleeve embedded directly into the foundation. The umbrella can then be adjusted directly into this.
2. The point-shaped connection via screws
If the parasol is not “stuck” into the ground, a solid anchor plate, similar to a post base, is concreted into the foundation instead. The base of the umbrella is then mounted on this plate using screws. This method is mainly used for large-format umbrella constructions, such as cantilever umbrellas that span terraces. Depending on the size and construction, this is based on type-related static calculations from the manufacturer, which provide very precise information about the foundation size and any reinforcement required. In addition, individual ground anchors tailored to the specific type of umbrella are usually offered. Regardless of which of the two variants is used, the step-by-step implementation of the foundation creation, including the necessary tools and materials, is largely the same:
The tool
- Spade or pickaxe
- Shovel
- Tear-resistant fabric tarpaulin
- Wheelbarrow
- Mason's trowel or garden shovel
- Bucket or small concrete tub
- Spirit level
- Squared timber, length approx. 1 to 2 meters (depending on foundation size)
- Wooden stick, diameter like parasol handle, e.g. broom handle
- Wood scraps for underlayment
- Hammer, pliers, nails
- Drilling machine with metal drill, approx. 5 millimeters
The material
- Ground sleeve or post base to match the existing or planned parasol
- Gravel or grit as bagged goods
- Concrete, e.g. ready-made dry concrete for direct mixing with water, in bags, also making sure it is suitable for outdoor use!
- possibly: structural steel as specified by system manufacturer parasol
Determine the foundation size
Before you break ground, you should think about how big your foundation needs to be. This is the only way you can prepare and obtain the work and the necessary materials accordingly.
1. “Commercial” parasols:
The manufacturers generally do not specify foundation dimensions for the classic parasol from the hardware store or discounter. The matching ground sleeve is also rarely included. Instead, you rely on standardized products that are suitable for a variety of umbrellas.
- At least 10 to 15 centimeters of concrete cover all around the sleeve
- Foundation width is usually 40 x 40cm sufficient
- Depth depends on ground sleeve, height of ground sleeve + 10cm
2. Large size parasols:
If, on the other hand, umbrellas with large spans and therefore large forces are used, the manufacturer's information on the dimensions of the foundations should definitely be observed. For systems spanning terraces, dimensions of 1.00 x 1.00m can easily be created in order to create a sufficiently large mass and an adequate abutment for the umbrella.
- Width: according to manufacturer’s information
- Depth: usually at least 0.80m for frost-free foundation
Note: Care and maintenance are often easier with large-format parasols as they are designed for durability and require dismantling, for example of the covering.
Tip:
Strictly speaking, even small parasols would need a frost-free foundation, i.e. a foundation to a depth of around 80 centimeters. The main problem with ground freezing in winter is the irregularity with which it happens. In case of doubt, flat foundations can be raised unevenly and then sink again later. As a result, the umbrella will be at an angle in the future. With small foundations, this risk is negligible, so a significantly smaller depth can be aimed for.
Step 1 - The excavation
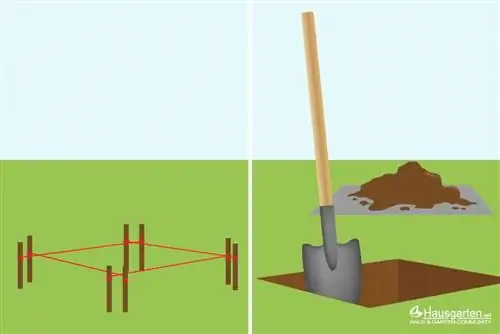
First of all, of course, it's about creating a hole suitable for the foundation, in which concrete can be poured later.
- Stake out the foundation evenly in all directions from the planned umbrella location
- Cut the lawn and store it on the side in sod
- Loose the soil with a pickaxe or spade and store it on a fabric tarpaulin for later disposal
Step 2 - Preparations
Before the concrete is actually poured, there are still a few things to prepare. Incidentally, formwork for the foundation is not included. The concrete is poured directly against the ground, so that good interlocking of the ground and foundation increases the possible power transmission.
- Cover the foundation base with 10cm of grit or gravel and level off the surface
- Ground socket (if not present) provided with a hole at the lowest point for the drainage of rainwater
NOTE:
Since the parasol and the ground sleeve are outside, water can get into the ground sleeve when it rains. The sleeve is provided with a hole so that it can escape from there. The gravel pack under the foundation allows water to drain and seep away. If water drainage is not provided, rust or an undesirable biotope of bacteria, insect spawn and other things can arise in the long term.
Step 3 (Optional) - Structural Steel
If structural steel needs to be installed in the foundation, this will be done now, before the umbrella stand is aligned.
- Insert steel into foundation hole according to manufacturer’s instructions
- Make sure there is sufficient distance to the ground on all sides (at least 3 to 5 centimeters)
- Put small stones or pieces of wood at the bottom as spacers
- Drive at least two vertical steel rods into the ground along the steel grid or basket and attach reinforcement to them with wire (buoyancy protection when concreting)
Step 4 - Aligning the post base or ground sleeve
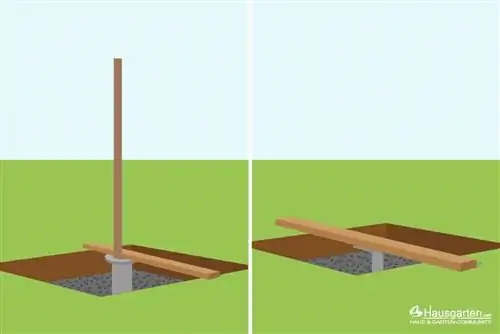
The last step before pouring the concrete is to insert and align the core piece, i.e. the ground anchor.
For ground sleeve:
- Insert wooden stick into sleeve to replace umbrella
- Set up the sleeve on the gravel bed and if necessary adjust the height by removing or adding gravel - the top edge of the sleeve is the same as the top edge of the lawn
- Place the squared timber over the hole next to the “shade replacement”
- Align the rod vertically on all sides using a spirit level and fix it to the squared timber
For screw-on anchor plate:
- Fix the anchor plate with nails through screw holes from below to the squared timber
- Place squared timber with anchor plate over foundation hole and place in the middle
- Adjust the height using wooden supports and align horizontally on all sides using a spirit level
Tip:
The longer the straight sticks, i.e. broom handle and squared timber, are, the more precisely the anchor plate and ground sleeve can be aligned. While at 50 centimeters a deviation of 5 millimeters is easily overlooked, at 2.00 meters in length this already has an impact of 2 centimeters and is much more noticeable!
Step 5 - Concreting
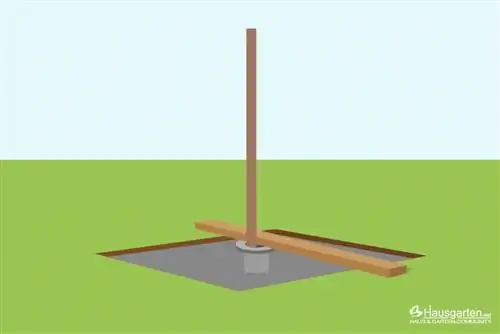
Now the time has come, the foundation is created and the future position of the umbrella is literally cast in concrete.
- Mix concrete according to the manufacturer's instructions, paying particular attention to the right consistency
- Pour concrete into the foundation hole in layers and “shake” it again and again using a rod
- Fill concrete up to 5 centimeters below the lawn level and smooth the surface
- Cover concrete with foil or cardboard and protect it from excessive drying out by the sun and rain
- Water large-format foundation areas with water after a few hours
NOTE:
The purpose of shaking the concrete is to transport any air bubbles that form to the surface. If they remain in the concrete, cavities are created that can reduce resistance in extreme cases. By the way, you don't have to hit the concrete with force, a moderate movement with a stick up and down in the concrete is sufficient.
Now it's done. You can usually remove the wooden structure above the anchor after a day at the latest. Depending on the concrete used, however, it can take two to around 14 days until sufficient strength is achieved to safely support even large loads. Finally, you can now cover the foundation with garden soil and sow new lawn, or put back the previously removed lawn sod. This means your foundation becomes almost invisible and blends harmoniously into the garden. As soon as the sun gains strength, you can now simply adjust your parasol into the ground socket or screw larger structures onto the anchor plate.


