- Author admin caroline@plants-knowledge.com.
- Public 2023-12-17 03:39.
- Last modified 2025-01-24 12:45.
The intensive agricultural use of meadows, fields and forests has led to the natural nesting places for birds becoming fewer and fewer. This particularly affects the so-called cave breeders, who specifically hide and raise their offspring in a breeding cave. The woodpecker is the most widespread cave-nesting bird in our country. Homemade nesting boxes can be a great help to secure your population.
Breeding behavior
Woodpeckers lay their eggs in cave-like structures that they prefer to break into trees. In these caves they also incubate the eggs and raise their young. Young woodpeckers are therefore typical nesters. The nesting box offers special protection from external influences and especially from nest robbers. If woodpeckers cannot find suitable trees to create a breeding hole in, they will not reproduce. Then at the latest it can be helpful to create a kind of artificial cave with a self-made nesting box. However, it is important to take into account the specific requirements that woodpeckers have. The main focus must be on the dimensions, the size of the entrance hole and the height at which the nesting box is installed.
Material
A nesting box is naturally exposed to wind and weather. It goes without saying that this requires building materials that can withstand the effects of the weather. By far the most important material is wood. Traditionally, the nesting box is made from wooden boards. Some types of wood are better suited to this than others. Spruce boards, for example, have all the properties they need. Poplar boards are also wonderfully suitable for a wooden breeding cave. Whichever wood you choose, the most important thing is that it has high resistance to moisture. It shouldn't tear easily either. So-called pressed wood and plywood, on the other hand, are completely unsuitable - at least if the nesting box is to be used for longer than one season. Natural spruce and poplar boards are easily available from hardware stores or specialist wood shops. They also cost relatively little.
Note:
The boards should not be planed smooth. The birds find a better grip on an unplaned, rough surface.
Other materials you need:
- two metal hinges to be able to open the lid later
- Material to seal the roof such as zinc sheet or tar paper
- a hook and an eyelet so that the nesting box can be closed securely later
- non-rusting, galvanized nails or brass screws to attach the pieces together
In addition, you should provide yourself with a water-repellent material such as linseed oil. This means that the entire nesting box is impregnated and made water-repellent after completion. Chemical waterproofing agents and varnishes are taboo. There is a risk that the he alth of the birds will suffer due to emissions. By the way, the waterproofing has to be renewed every year.
Tools
A nesting box is a relatively simple construction that doesn't require much effort. You should therefore usually already have the tools needed for construction. Specifically you need:
- Tape measure, pencil and square for marking the correct cuts on the components
- a jigsaw or a foxtail for the cuts
- Hammer, screwdriver and pliers
- Drilling machine with hole saw attachment to saw out the entrance hole
Tip:
If you don't have a hole saw attachment, you can just use a drill. It is used to simply drill a hole and then expand it manually using a rasp to create an entry hole.
Construction
As already indicated, a nesting box is a downright simple construction. In principle it only consists of four side parts, a base part and a roof. There is an entry hole at the front of the box so that the animals can get inside. A perch should be avoided. On the one hand, they don't need the animals, but on the other hand, it would make it easier for predators to get to their prey. The roof of the nesting box construction can be opened as can the back. The roof can later be used to check what it looks like inside. And the box is cleaned via the open back after the breeding season.
Dimensions
Birds are different sizes and have different needs. It is logical that the size of a nesting box should be tailored to the type of bird. Basically, a nesting box will primarily be used by cavity nesters. We want to build a nesting box specifically for woodpeckers. Regardless of the species of woodpecker, the following dimensions have proven to be effective:
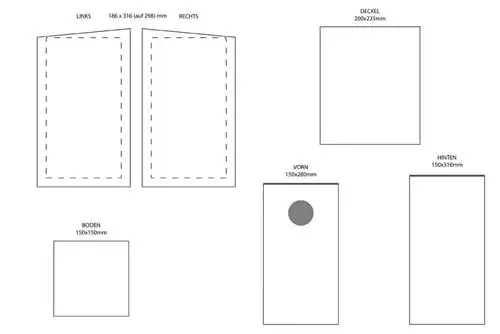
- inner width: 150 millimeters
- inner height: 280 millimeters
- inner depth: 150 millimeters
- Diameter of entrance hole: 45 to 50 millimeters
These dimensions are the minimum dimensions that are definitely required for a woodpecker family. Of course, the nesting box can also be a little larger. The thickness of the boards used is also important. The ideal thickness is 18 millimeters. This means that the boards are thick enough to protect the woodpeckers inside the box from the cold if necessary. 18 millimeters is also a standard thickness in which boards are usually cut. It should therefore be very easy to get in stores.
Construction instructions
Building a nesting box requires neither a complicated construction plan nor any special craftsmanship. The construction is so simple that practically anyone can do it quickly and without any problems. Basically, all you do is cut six boards and then attach them together with nails. Everyone should be able to do that.
Cutting
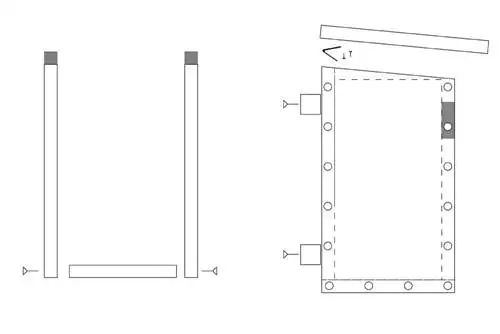
The first step is to cut the purchased boards to the correct size. In order for this to be successful, the dimensions should be marked beforehand. It should be noted that the back should be slightly higher than the front in order to ensure a roof slope later. This also means that the two side panels at the top need a corresponding slope from back to front. How strong the inclination is is relatively irrelevant and is up to each individual. It should only be ensured that water can drain away. The slopes themselves are best marked with a square measure. When marking and cutting, you should be as careful as possible in order to get precisely fitting individual parts. Accuracy of fit guarantees that the finished nesting box is really tight.
Cut entry hole
Before assembly begins, the entrance hole must be cut into the front. The easiest way to do this is to use a hole saw attachment on an electric drill. The hole is made in the middle of the upper third of the front. It should not be too deep, but just below the roof. To do this, simply measure the exact middle from the left and right and mark a point at this point with a pencil. You then place the tip of the hole saw attachment on this point and drill the hole. If you don't have such an attachment, simply drill a hole at the designated point and then enlarge it by hand with a rasp.
Assembly
The two side parts and the front part are first nailed to the base plate or alternatively screwed on. The three parts must then be completely nailed together.
In the next step, the tar paper or zinc sheet is attached to the roof with nails or screws.
Variant A
Screw the back to fit into the woodpecker hole.
The hinges are attached either to the back or to the side panels directly next to the back wall. Now put up the hinges to screw the roof tight.
Variant B
Before the back is inserted into the construction, the two hinges at the front are screwed onto the front or the side parts next to the front wall.
Then the back is inserted precisely into the opening and fixed at the top with two nails on the left and right. The nails serve as a kind of axis with which the page can be opened. There is also an eyelet in the lower area. The back can then be secured with a hook on the base plate.
Finally, all you have to do is screw the roof with the two hinges.
Under normal circumstances, assembling a nesting box like this doesn't take long. A construction time of around an hour should be completely sufficient. However, if in doubt, it is a good idea to give yourself a little more time. Care clearly takes precedence over speed when building a nest box. The birds will thank you later.
Suspension
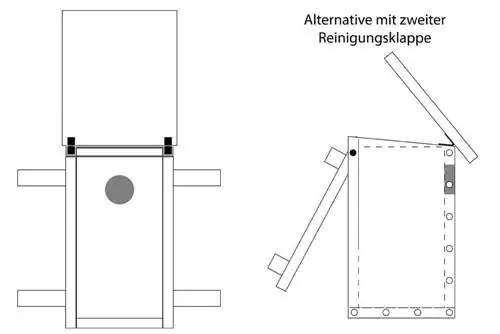
A nesting box for woodpeckers will usually be attached to a tree. The easiest way to do this is to use a strip that protrudes on the left and right and nails it crosswise to the back. A fastening wire is attached to both sides of the bar, which of course must first be guided around the building trunk. It is best to clamp an old, sturdy plastic hose between the wire and the bark to avoid injuring the tree. The wire is then tightened until the nesting box is stable. Under no circumstances should the box be nailed directly to the tree. When installing it, it is important that the entry hole is on the side facing away from the wind. The box should also be positioned so that nest robbers, especially cats, cannot reach it. The best time to hang it up is autumn, so that the birds can find shelter in it in winter.


