- Author admin [email protected].
- Public 2023-12-17 03:39.
- Last modified 2025-01-24 12:45.
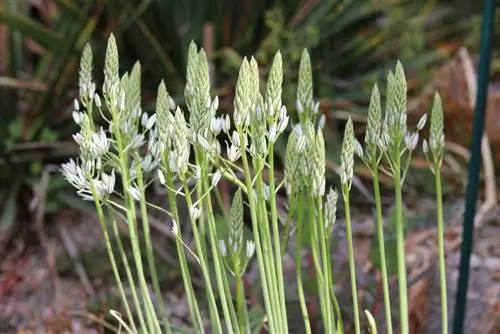
The umbel milk star transforms dreary areas along the edge of the wood or under sparse trees into a star-studded sea of flowers. With its flowering period from April to June, the delicate mass bloomer skilfully bridges the time between the classic early bloomers and lush summer bloomers. At the same time, the resilient onion flower scores with its undemanding care. What needs to be done so that Ornithogalum umbellatum spreads its carpet of stars every year is no longer hidden from you here.
Profile
- Plant genus milk stars (Ornithogalum)
- Species: umbel milk star (Ornithogalum umbellatum)
- Perennial bulb flower
- Hardy down to -20 degrees Celsius
- White starry flowers from April to June
- Growth height 10 to 25 centimeters
- Lancellate, deep green leaves
- Poisonous in all parts
- Other name: Star of Bethlehem
The umbel milk star not only creates a fireworks display of white flower stars in the bed; The delicate perennial is also very popular in flower boxes and pots.
Location and soil conditions
Like all bulbous flowers, an umbel milk star does not like to be in constantly moist soil. The risk of rot developing is too great. The following site conditions encourage the busy flowering plant to perform at its best:
- Sunny to semi-shady location
- Humose, well-drained soil
- Sandy-loamy to gravelly-loamy
- A pH value of 8-10 is ideal
For cultivation in the planter, conventional potting soil can be used as a substrate, which is tailored to the needs of Ornithogalum umbellatum with a few handfuls of sand or perlite. As a houseplant, a milk star can also tolerate full sun on a south-facing window, at temperatures between 16 and 25 degrees Celsius.
Care
Once an umbellate milk star has acclimatized to the appropriate location, the effort required for care is limited to the following activities:
- Water regularly when dry
- Let the soil dry out occasionally
- From March until the end of flowering, fertilize liquid twice a month
If withered flowers and leaves are cleaned out regularly, this measure encourages the Star of Bethlehem to sprout again.
Wintering

Since umbel milk stars can withstand low temperatures of -20 degrees Celsius, they remain in the ground during the winter. If the withered leaves are perceived as disturbing, they are cut off. In this case, however, wait until it has completely dried out so that the onion has enough time to store all the remaining nutrients. In particularly harsh locations, it is recommended to dig up the milk stars after flowering so that the bulbs can overwinter in a dry, cool cellar. There is no fertilization or watering during this time. Ornithogalum umbellatum in the planter, however, requires winter protection as the root area could freeze:
- Place a bucket or balcony box in front of a protective house wall on wood or Styrofoam
- Cover the container with bubble wrap or jute
- Store houseplants cool, but frost-free and dark
The substrate is protected with a layer of straw or sawdust. Fir fronds are also suitable for winter cover. In contrast to typical root plants, an umbel milk star is not watered even in clear frost.
Tip:
In order to better protect umbellate milk stars from extreme temperature fluctuations between frost and sun during the winter, knowledgeable hobby gardeners simply dig the pots in. Covered with leaves, sticks or straw, the flower bulbs get through the cold season well and can be brought out again in spring.
Propagate
A Star of Bethlehem uses two variants of multiplication. Daughter bulbs develop from several buds on the mother bulb. Numerous star blossoms will grow from this in the next season. In addition, after flowering, capsule fruits containing numerous seeds develop. You can now give an umbellate milk star free rein to spread independently in the garden, or you can propagate it under controlled conditions. Here's how to do it:
Progeny from breeding onions
After the mother onion has gathered all its leaves in June/July, it is removed from the ground with a digging fork. Using a sharp, disinfected knife, cut off the daughter bulbs. These are completely self-sufficient survival organs. They should be kept dry and dark until planting in autumn so that they do not sprout prematurely.
Sowing
The fresher the seeds when sowing, the better the chances of success. If you harvest the seeds yourself, it is recommended to sow them on the same day:
- Fill a seed tray with lean substrate, such as standard soil, peat sand or coconut fiber
- Scatter the fine seeds and sieve them with substrate or sand about 1 cm high
- Press down with a board and moisten with a fine shower gel
Ideally, place the seed container in a room greenhouse on a partially shaded window. Alternatively, cover the bowl with glass or foil. On the one hand, this measure creates a conducive, humid, warm microclimate that significantly improves the seeds' mood for germination. At the same time, the seeds are protected from insects that could lay their eggs right here. Germination begins within 3 to 4 weeks. While the cotyledons and then the first true leaves gradually develop, the substrate must not dry out. The cover is now ventilated more and more frequently until it falls away completely. Separating the delicate seedlings requires a bit of sensitivity; Following these instructions it works without any problem:
- Small pots half filled with minimally fertilized, very fine crumbly soil
- Make a small depression in it with a pricking stick
- Lift the seedling out of the seed tray with the pricking rod or a spoon
- Insert into the trough, surround with substrate and press down a little
The plants are watered with the spray bottle. The water supply from below is particularly gentle. To do this, place the cultivation pots in water and let the capillary action do the work. If the substrate surface feels moist, remove the containers. By the time of planting, strong umbel milk stars have developed, but they will only bloom two to three years after planting at the earliest.
Tip:
Substrate for propagation should always be sterilized before use in order to kill any pests, viruses and spores. Simply place in the oven in a fireproof dish for 30 minutes at 150 to 180 degrees Celsius.
Plants
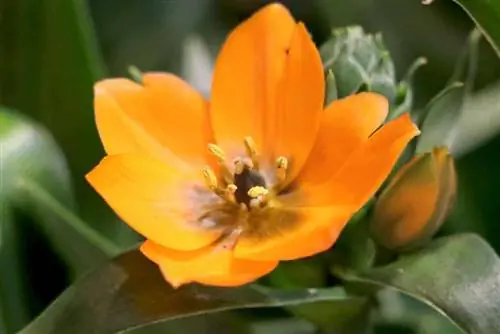
The planting time for the umbel milk star extends from September to November. At the chosen location, the soil is raked thoroughly until it is free of weeds and finely crumbly. Using a hand shovel, dig small holes with a depth of approx. 10 centimeters, at a distance of 15-20 centimeters. Ornithogalum umbellatum are particularly attractive in small groups of 5 to 10 specimens. Plant each bulb with the bud facing upwards, fill the hole with soil and water the planting site. If voles are causing mischief in the garden, using a vole basket is recommended. The close-meshed wire basket is first placed in the ground and then filled with soil and the flower bulbs. There is no need for a wire mesh cover as the pests are not active above ground.
Conclusion
The umbel milk star ensures uninterrupted flowering in the plant composition of the garden. When the classic early bloomers are waning and the summer flowers are still in the starting blocks, the hour comes for the white starry flowers of Ornithogalum umbellatum. In order to enjoy this abundance of flowers, little care is required. The substrate should not dry out and should not be permanently wet. A portion of fertilizer every 2 weeks ensures the nutrient supply. Under normal conditions, winter protection is only advisable in a planter.

