- Author admin [email protected].
- Public 2023-12-17 03:39.
- Last modified 2025-06-01 06:48.
Before noble roses beautify our gardens with their wonderful flowers, they usually have to be propagated through grafting. The gardener uses this to transfer one or more buds - the “sleeping eyes” - to a strong base. Basically, the method is not rocket science and can be easily mastered even by laypeople - as long as the appropriate specialist knowledge about the correct procedure and the optimal time is available. Rose grafting only works when the plant is ready for growth.
What is refining?
When grafting roses, the gardener does not create a new variety, but rather multiplies an existing one. Since the popular noble roses in particular are considered to be susceptible to diseases and have weak growth, they are transplanted onto the rootstock of a robust and vigorous wild rose. In this way, the rose breeder practically turns two roses into one by combining the desired characteristics. As a rule, this happens with roses through inoculation, i.e. H. by transferring buds of the desired variety to the root collar or, in the case of standard roses, to the trunk of a rootstock. However, only the so-called scion should be expelled, but not the rootstock.
Preparation of the base
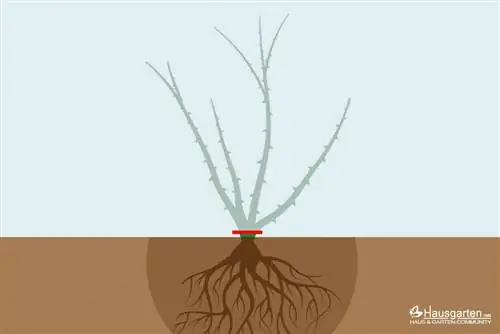
The actual finishing process only takes a few minutes, but the lead time is even longer. If you want to propagate noble roses yourself, you need a lot of patience. This begins with the selection and preparation of a suitable rootstock, which must already have a strong rootstock at the time of inoculation.
Time Forward
Experienced rose nurseries plan to propagate their roses over a period of two to three years, because the wild rootstock must first be propagated and grown from seeds. In this context, propagation from cuttings rarely takes place because seedlings are considered stronger and more robust. So before you start propagating your rose, first take care of the cultivation and care of your rootstock. Of course, you don't have to grow these yourself; you can buy them ready-made from a tree or rose nursery and save a lot of time.
Plant the rootstock in good time
However, the purchase of the rootstock must be planned in good time, because it should be planted in the desired location in the fall of the previous year - but no later than March or April. Here the wild rose should develop a strong rootstock and grow well so that it has enough strength to grow together with the scion. Weak roots prevent the success of inoculation and cause the scion to die. Therefore, prepare the rootstock well through timely planting and careful care:
- select suitable location
- sunny with loose, nutrient-rich soil
- Dig the planting hole sufficiently deep
- Mix the excavated material with compost and horn shavings
- Water the soil thoroughly after planting
- Hill up the base before winter (e.g. with compost)
- Avoid frost damage
- water when it is dry, especially from spring and summer
Tip:
In the spring after planting, the wild rose should sprout vigorously, as this is an unmistakable sign of a he althy and strong rootstock.
However, if fewer than three shoots appear, it is a weak rootstock and therefore not very suitable for grafting. To be on the safe side, plant several wild roses, as the failure rate is already quite high at around 30 percent on average.
Selection of scions
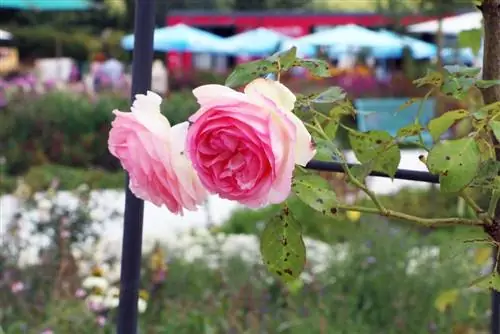
Once the base has been prepared, select a suitable variety of noble rose. It must be a he althy, strong and richly flowering plant that is already a few years old and has proven itself well. Remember that this is a vegetative form of propagation, i.e. H. The refined rice has exactly the same properties as its mother plant. By the way, this doesn't necessarily have to be in your own garden or that of your neighbor, because you can purchase grafting materials such as buds and scions from specialized rose nurseries and use them for grafting yourself. This material should be processed immediately upon receipt and not stored temporarily - any storage reduces the growth potential and thus the success of the project. It is best to cut the scion freshly yourself and transplant it immediately onto the rootstock.
Note:
Please note that many of the modern varieties are trademarked and you must purchase a license from the breeder to be allowed to propagate them. Without appropriate permission, you are committing a crime and can be legally prosecuted.
Rose refinement through inoculation
If you now have a strong, at least two-year-old rootstock and a he althy, flowering noble rose (or the corresponding finishing material), now get started with the seeding. However, you cannot do this at any time of the year, as the chances of success are highest during the period of greatest growth. The plants should be “strongly saping”, as the gardener says, have numerous new shoots and have just finished flowering.
Season
For most types and varieties of roses, this occurs in July, which is why this summer month seems to be the most suitable for rose grafting. Pay attention to the shoots of the plants involved, which should appear he althy, green and juicy. In the previous months, ensure there is sufficient water supply, especially during any dry phases, so that the rootstock and the rose are not under drought stress and therefore grow poorly. The so-called cambium - the growth layer behind the bark - must be slightly moist so that the bark can be easily removed for inserting the eye cut out of the rose. But July is not the only month that is ideal for rose grafting This period is extended depending on the underlay selected:
- Dog or dog rose 'Inermis' (Rosa canina 'Inermis'): Grafting possible between June and September, but sensitive to drought
- Dog or dog rose 'Pfände' (Rosa canina 'Pfände'): Grafting between July and the end of August, quite drought-tolerant
- Hedge or bush rose 'Laxa' (Rosa corymbifera 'Laxa'): very early grafting period between June and mid-July
- Tufted rose or multi-flowered rose (Rosa multiflora): grafting possible between July and August, strong-growing
Tip:
For a standard rose, it is best to use the variety 'Pfände' as a rootstock, as it is a good stem builder.
Time of day and weather
In addition to the right season, also pay attention to the right time of day and weather on the day of grafting. If possible, do the inoculation in the late afternoon on a not too hot but dry summer day. Roses grafted early in the morning or even at midday dry out quickly at the grafting site because the sun shines on them intensively and the sap flow is not yet possible due to the lack of connection between the two parts of the plant. Rain is also unfavorable because it promotes putrefactive diseases: the open wounds are ideal entry points for all kinds of pathogens. They are often transmitted through rain, which practically washes fungi, bacteria, etc. into the wounds.
Refining roses on standard stems
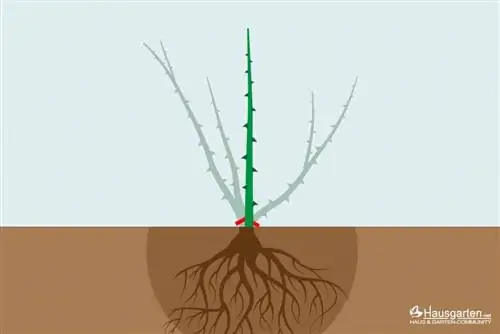
When it comes to the right time, there are no differences between standard and shrub roses. With stem roses, however, you have the advantage that if the grafting goes wrong and the eye doesn't grow, you can cut off the top end of the stem and try again lower down.
Refining roses - step-by-step instructions
As soon as all the preparations have been made and a he althy rose and a strong base are available, you can now start the actual refinement. In the case of roses, this usually happens through what is known as oculation, i.e. H. the eye refinement. Simply one or more eyes are removed from the scion and inserted into the base. The method is quite uncomplicated and easy to do even for laypeople; you just need the right tools and a little experience.
Material and tools
The right tools are essential for successful rose refinement. You need:
- rose scissors
- a stocking knife
- Bandage material
Some experienced rose growers simply cut the eyes out of the scion with a sharp razor blade, but it is easier with a special grafting knife. This has several blades with which you can carry out all work steps. After inserting the eye into the base, bandage the area so that germs cannot penetrate. This requires clean bandages, and you have various options:
- Refining plaster (“oculet”)
- Refining or rose gum
- Bast
- Adhesive tape
Special wound closure products are not necessary for oculations. On the one hand, a sterile bandage ensures that the wound is closed and that pathogens cannot penetrate, but on the other hand, the cut surface is very small anyway.
Hygiene
Much more important than the right tools is correct hygiene: all materials, including the scissors and the grafting knife, must be sterilized before use. Otherwise, there is a great risk that germs will get into the wounds and the grafting will then fail due to infection. So clean all tools thoroughly and disinfect them with pure alcohol or a disinfectant from the pharmacy. The bandage material, if packaged, is clean anyway. Furthermore, the cutting blades must be sharpened carefully, as dull knives or scissors cause bruising - which in turn prevents the eye from growing.
Preparation of the base
Then first cut back the rootstock: For a rose bush, cut off all wild shoots above the root neck, as you will use the eyes of the scion there and only need the rootstock of the wild rose for the refinement. For a standard rose, leave a bare, straight-grown shoot as the future trunk and cut off all other branches directly at the root neck. Here the refinement takes place at the end of the trunk, for which you need to use at least three to four eyes to get an even crown. After pruning, clean the base carefully, for example with a damp cloth, so that no dirt gets into the wounds later.
Bud extraction
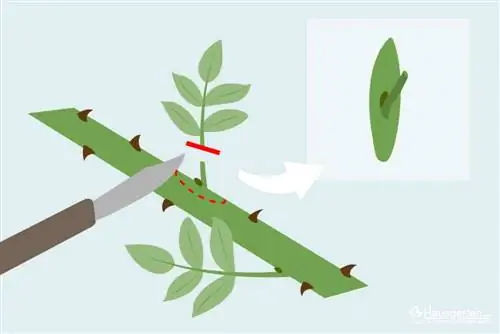
Now the time has finally come and the hour of actual refining has come. For this you need suitable scion eyes:
- cut off a he althy, flower-bearing side shoot
- Flowers should be faded
- Remove flowers, spines and leaves
- Leave the stems of the leaves standing
- Shorten leaf stem bases
- The “sleeping” eyes are located in the leaf axils
- Hold the scion so that the stalk points towards the body
- Carefully cut out the leaf axilla bud with a straight cut
- Place the blade below the eye
- Make the cut flat under the eye towards your body
- also cut off a piece of the bark
- Cut should be about two centimeters long
- turn over cut out eye
- Carefully peel off the wooden sign on the back
If you are still a little unsure about removing the rose eyes, you can first practice the cut described on another shoot that is not intended for grafting. Be careful not to hurt the eye.
Occulate
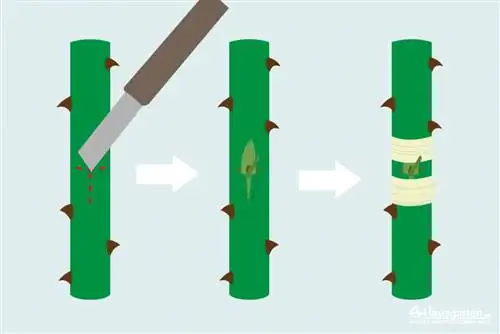
Now turn back to the base and make a T-shaped cut in the bark at the root collar, a few centimeters above the ground. Open the resulting pocket by gently pulling the bark apart with your fingers. Gently push the precious eye in with the tip pointing upwards. Cut off visible parts above the horizontal cut with a sharp knife and immediately bandage the grafting area with a suitable bandage.
Subsequent care
Now pile some compost onto the root collar, but do not under any circumstances cover the grafting area. Don't touch it anymore, it's best to leave the rose alone. But check regularly for new shoots: wild shoots should be removed immediately, while the shoots from the grafted eyes are allowed to remain of course. Wild shoots often grow directly from the rootstock and are also colored differently than shoots of the noble variety. These are usually characterized by a light green, soft bark and reddish spines.
Tip:
Many tree or rose nurseries offer courses for hobby gardeners in which proper grafting can be learned. Just ask your specialist gardener or the nearest adult education center.


