- Author admin [email protected].
- Public 2023-12-17 03:39.
- Last modified 2025-01-24 12:45.
Regular watering of the garden is essential in summer. This can sometimes be annoying and very stressful. It becomes much more convenient if an automatic irrigation system takes over the water supply. This works reliably even when the garden owner is away. The best solution is so-called drip irrigation, which waters the plants drop by drop. This requires one thing above all else: one or more drip hoses.
Drip irrigation principle
With this form of irrigation, the water is delivered drop by drop to the plants in the garden or on the balcony - more or less continuously. To do this, hoses are laid in the immediate vicinity of the root area, which in turn are connected to a hose line and a water connection. The system is usually linked to an irrigation computer or a mechanical timer. Both ensure that water is supplied at a predetermined time period. The hoses on the roots of the plants can be laid both above ground and underground. Their special feature is that they are either porous or perforated. The principle has a whole range of advantages:
- continuous water supply directly in the root area
- very economical use of water as a resource
- effortless and largely independent watering
- no wastage such as with irrigation
- no drying out of the soil
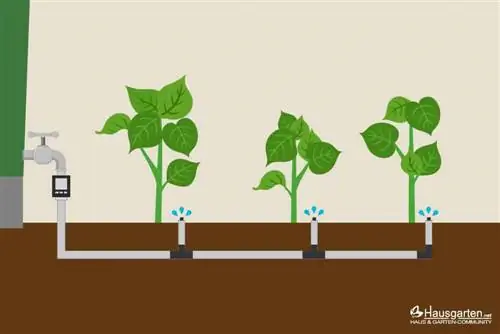
Sometimes a bit problematic about the system is that hose lines often have to be laid across the garden to beds or individual plants. This can sometimes lead to problems when mowing the lawn, for example. It is therefore advisable to always lay the cables or hoses along edges and paths. The problem can be solved even more easily by burying the pipes underground about ten centimeters deep. However, this involves a lot of work.
Tip:
A drip irrigation system is ideal for collecting rainwater and using it for watering. The main line of the system simply needs to be connected to the rain barrel.
Make your own drip hose
The simplest form of such an irrigation system consists of just a conventional garden hose. To do this, the hose must first be perforated on one side, i.e. provided with holes. Here's how to do it:
- First clean the garden hose thoroughly
- spread it out largely in a straight line
- draw as straight a line as possible on one side
- make small holes along this line with a pointed tool
- each hole must completely penetrate the hose wall in question
- Distance between the holes is based on the distance between the plants
- always only perforate the part in the plant area
- Attach the hose to the ground with clamps
- Connecting a hose to a water source
For the system to work, a water pressure of at least 0.5 bar is required. This is usually not a problem when connecting to the public water supply. However, it becomes more difficult when connecting to a rain barrel. It can help to place the bin in an elevated position or to install a simple garden pump between the bin and the hose. If a larger area is to be supplied with water in this way, several hoses are usually necessary.
Tip:
The longer the hose is overall, the smaller or finer the holes must be to ensure a continuous flow of water.
Build system
Making a drip hose yourself is particularly suitable for very small gardens and to try out the principle first. However, if you want or need to use a more complex system for a larger garden, you should buy the drip hoses ready-made from a specialist retailer. There are starter sets there that contain everything you need to get started. These sets are relatively inexpensive and can be expanded at any time.
First, a fundamental decision must be made: Should a perforated or porous hose be used. With a porous hose, the water diffuses through the hose wall along its entire length. It is particularly suitable for being buried. It is ideal for supplying water to beds. A perforated hose actually releases the water drop by drop. It can be used to specifically control individual plants. If the plant pots on the balcony are to be watered, only the perforated hose variant is possible.
Tip:
Before purchasing or setting up an irrigation system, it is crucial to plan as precisely as possible, in which, above all, the route of the pipe should be determined as precisely as possible.
If you want to make a system like this yourself, you can in principle distribute the cables across the entire garden. First, a main pipe is laid from the water connection. Branches must then be attached to this main line, which lead directly to the plants or beds so that the water can be delivered there. There is often a special nozzle at the end, which then needs to be cleaned from time to time. The respective amount of water can also be dosed using this nozzle.
Build and bury
Normally, the complex irrigation system is laid above ground and the individual pipes are attached to the ground with clamps. However, as already mentioned, this can lead to significant problems in the garden. If you want to avoid this, it is best to bury the lines or hoses in the ground. To do this, small channels with a minimum depth of around ten centimeters must be dug into which the hose fits comfortably. These channels are then covered with soil again. With classic drip irrigation, the hose only appears on the surface again in the root area of the plant.
Balcony
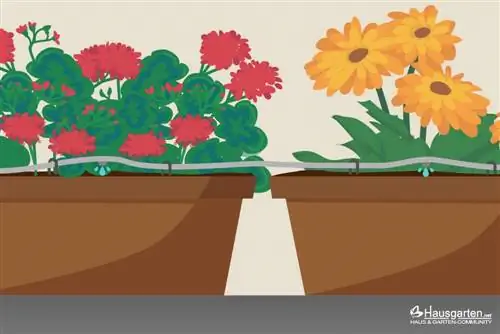
In order to supply the plant pots on the balcony or terrace with drip irrigation, exposed pipes at the height of the pots are sufficient. They should be placed so that they run along the side facing away from the viewer. The cable is secured with a clamp in the soil of the bucket. With this variant, only the public water supply can usually be used, as the pressure in a rain barrel is usually not sufficient for the elevated area.
Watering the lawn
A lawn cannot be watered with a drip hose. The effort required for an optimal water supply would be far too great. Here it is advisable to have a second main line branched off from the water source in the system, at the end of which there is then a water sprinkler or sprinkler.

