- Author admin caroline@plants-knowledge.com.
- Public 2023-12-17 03:39.
- Last modified 2025-01-24 12:45.
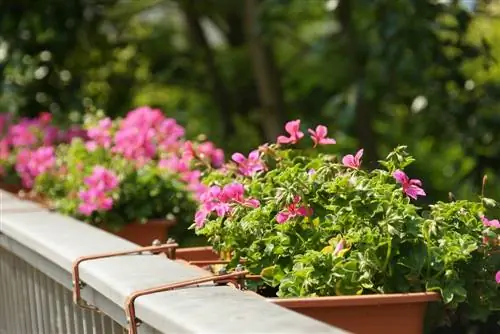
A balcony is only truly complete with a balcony box with colorful flowers. A bright, vigorous flower display completes the atmosphere on the balcony and radiates naturalness and joie de vivre. So that the flowers really feel comfortable in the balcony box, the correct planting process is briefly described here.
The balcony box
The first priority is to choose the optimal planter. It must fit the balcony well in both size and appearance. For example, a clay box with decorative elements in a relief structure is ideal for a more rustic wooden balcony. A soberly designed metal balcony, on the other hand, benefits from an equally sober and elegant box. The size of the box should also fit the balcony. Fastening is also important: For example, is the railing suitable for hook-shaped suspensions or does a more complex type of installation have to be chosen? If necessary, advice in store may be helpful.
The preparation
If all the necessary things are at hand, planting goes very quickly. In addition to special balcony box soil, there are also small pebbles or shards of pottery, as well as a small garden shovel, gloves and a watering can. If there is no insensitive surface available or if the planting has to be done in the apartment, it is recommended to use newspaper as a base.
Planting the box
To prevent waterlogging and mold from forming, a layer of pebbles or shards of pottery should be placed on the bottom of the box. This layer completely covers the bottom of the box and ensures that excess moisture can drain away immediately. The potting soil is now filled onto this layer to a level of about two thirds of the box and pressed down lightly. There must be enough space under the upper edge of the box for watering.
Now the flowers are used - information about the most suitable types of flowers will follow below. Each flower is placed in a hole in the potting soil without its plastic pot, whereby the root ball must be well moistened. If the flowers were purchased with a rather dry ball, it is advisable to water them well a few hours before planting.
When it comes to the distance between individual plants, it should be taken into account that they will still spread once they are established - half a plant diameter as a distance is advisable. After a short time the gaps close and an uninterrupted row of beautiful colorful flowers is created.
Optimal flowers for the balcony box
Depending on the season, different types of flowers are suitable for beautifying the balcony. In spring these are:
- Pansies (partial shade to sun)
- Mini daffodil (partial shade to sun)
- Cushion primrose (partial shade to sun)
- Cyclamen (partial shade to shade)
- Iris (warm and sunny)
- Amazing beauty (partial shade to sun)
- Ranunculus (Sun)
The following flowers can be used well in summer:
- Tagetes (partial shade to sun, they tolerate wind)
- Busy Lieschen (partial shade to shade)
- Zinnia (sun)
- Lobelias (partial shade to sun)
- bleeding heart (partial shade to shade)
- Lunchflower (sun)
- Liver balm (sun, no wind)
Further care
Regular watering is extremely important for balcony flowers. After the first generous watering, it is advisable to constantly check the flowers - a single sunny day can unexpectedly cause a lot of water to evaporate.
Balcony box soil is already provided with a basic quota of fertilizer, so the first fertilizer only needs to be applied after about five weeks. A special fertilizer for balcony plants is also offered here, which contains the nutrients and minerals necessary for rapid flowering plants. Solid fertilizer is incorporated into the top layer of soil, while liquid fertilizer can be added to the irrigation water. The quantities can be found on the packaging and vary from manufacturer to manufacturer. Withered flowers and plant parts should always be removed - this encourages the flowers to continue growing and blooming - so the balcony box offers a colorful sight all spring and summer.
Unleash your creative talents
Before you start planting, first place the flower pots in the containers provided. This means you can choose the color combinations you want at your leisure. Fill the containers with fresh soil, take the plants out of the pots and plant them relatively densely. Press down the soil, water it and add some more soil if necessary. You can protect your spring oasis from late frosts with air-permeable fleece.
Red-Yellow-Blue: With this color combination typical of spring you are always right. Especially when a blue reticulated iris is involved. The miniature version of the garden iris only grows to a height of 20 cm. Its flowers have a delicate scent of violets.
Planting bulb flowers correctly in the flower box
- Tulips, daffodils, hyacinths and other bulb flowers can't stand wet feet: they start to rot all too easily. If you want to plant bulbous plants in boxes or pots, it is particularly important to ensure good water drainage. So first cover the drainage holes in the planters with some shards of pottery.
- Next, fill in a so-called drainage layer, which allows the water to drain away more easily. It should be several centimeters high. Gravel or expanded clay, for example, are suitable for this. Cover the drainage with a thin fleece, jute, burlap or similar so that the earth cannot be washed in.
- Use good, sandy potting soil when planting. Fill the container with this until about two centimeters below the top edge. Press the substrate carefully into place. Drain carefully. From now on, always keep the soil moist, but never wet.

