- Author admin [email protected].
- Public 2023-12-17 03:39.
- Last modified 2025-01-24 12:45.
If you want to carve a pumpkin for fall decoration or Halloween, choose the appropriate specimen carefully. The pumpkin should be as ripe as possible. Ideally, you should let the pumpkin dry for around 14 days after purchase.
This causes the pumpkin to ripen, making the shell firmer and easier to work with. You should also make sure that the fruit has no external damage so that it does not rot prematurely. Medium to large pumpkin fruits are particularly suitable for carving.
Carving a pumpkin - preparation and tools
Simple knives and spoons of different sizes can be used as carving tools. Even with a small saw blade you can work very well and precisely. The retailer also offers carving sets that were specifically made for pumpkin carving. Before you start, prepare a collecting tray for the pulp. You should not underestimate the volume inside the pumpkin and choose an appropriately large bowl or bucket.
Pumpkin carving instructions
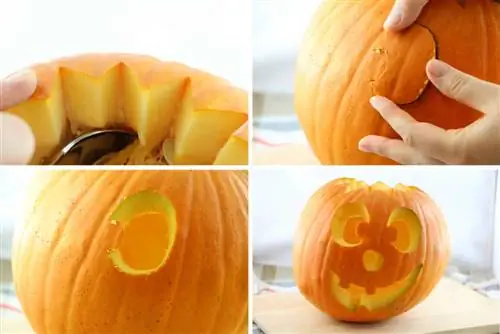
Pumpkin carving begins by cutting out the lid at the top where the stem is. The cutting can be star-shaped, square or simply round. It is important that you move the knife at an angle when cutting so that the lid has an edge to sit on. The cutting angle of the lid should be around 45 degrees or slightly less to avoid falling inside. The pulp is then scraped out with a spoon. The soft pulp is removed except for a side wall that remains two centimeters thick. Pumpkin pulp from edible fruits is very he althy and tasty. Therefore it can be kept cool and later used in various dishes. It is best to use pre-drawn stencils or templates for the pumpkin's face. When choosing a suitable stencil, the size and shape of the pumpkin fruit should be taken into account. Then you place the template on the desired location and fix it with small pins. Now the contours can be firmly transferred onto the pumpkin with a felt-tip pen. When carving you should always work from the inside out towards the edge to avoid injuring yourself. Smaller parts are cut out first, then the larger parts. It happens that small parts break off. These can be easily reattached using needles or toothpicks. At least two needles are used for one part to ensure a sufficient hold. Finally, the pumpkin is cleaned and smoothed with a smooth cloth. The lighting is then provided with a tea light or, for safety, with an artificial light.
Note:
With our free templates, anyone can carve their own unique face into a pumpkin.
Pumpkins - shelf life
If the pumpkin dries out and changes shape, you can put it in water for about half an hour to slow down the process. Hairspray and clear varnish are also said to extend the life of carved pumpkins. However, you cannot preserve the pumpkin permanently, so you should think about taking a souvenir photo in good time.

