- Author admin caroline@plants-knowledge.com.
- Public 2023-12-17 03:39.
- Last modified 2025-01-24 12:45.
Holes in a plastic window are easy to drill and are often unavoidable. Repairing is more complicated, but is also possible without any problems with our tips.
Repair putty
The easiest and fastest way to repair a plastic window is to use repair putty. Required:
- rags and pulp
- Cleaning supplies
- Repair putty
- Spatula or cutter knife
Instructions
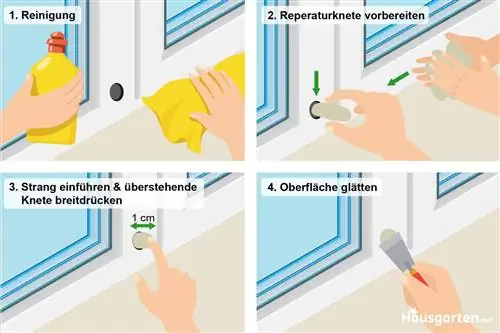
1. Cleaning
So that the repair clay sticks to the material, the window frame must first be thoroughly cleaned. Greases, oils, dust and other dirt could negatively affect the grip. After basic cleaning with detergent and water, the area can be wiped again with alcohol. This allows residues to be safely removed.
2. Prepare repair clay
Before mending, the clay must be worked with your fingers so that it warms up slightly and becomes more malleable. Forming it into a strand between your hands is recommended for holes in order to seal the area behind the opening.
3. Insert strand
The clay should be shaped so that it can be inserted into the drill hole and has a protrusion of about one centimeter. This overhang is spread outside the hole so that it is circular, similar to a nail head, and securely seals the opening.
4. Smooth surface
So that no raised areas remain, the excess can now be removed using a spatula or a flat cutter knife. After it has completely dried out, sanding and painting may be necessary.
Note:
This variant is particularly recommended for smaller holes. Larger drill holes cannot be sufficiently closed with this. In any case, it is important to follow the manufacturer's instructions. Because the products can differ in their application.
Foaming
This is not a complete repair, but rather preparation for the use of filler or, if necessary, repair clay. The effort is greater, but the results are often more convincing.
Requires:
- Construction foam
- masking tape
- rag or pulp
- Cleaning supplies
- Spout
Procedure
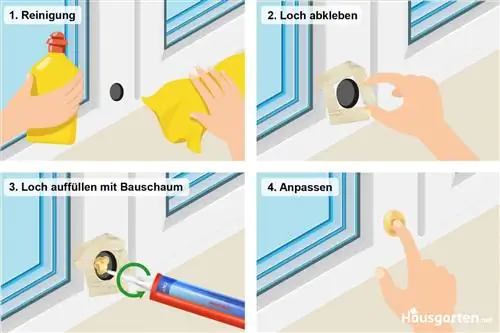
1. Cleaning
The window frame must be thoroughly cleaned before further steps can be taken. Otherwise, the masking tape will not hold properly and the foam can spread and settle in unwanted areas. Coarse dirt can be easily removed with dishwashing liquid. Any residue that may be present can be dissolved with alcohol and wiped off.
2. Masking
The construction foam is used for foaming and thus as a basis for another layer of sealing. The drill hole should still be masked so that the material does not stick to the window frame. Even with a suitable nozzle, the foam can escape beyond the edges of the drill hole.
3. Refill
When the preparatory work has been completed, the foam is filled into the drill hole using an appropriately sized nozzle. The nozzle should be moved clockwise so that as much of the mass as possible is available behind the hole.
4. Customize
After filling, a small dent should be made with your finger directly behind the drill hole. This serves as a starting point for filler or repair clay.
5. Allow to harden
Before further processing is possible, the foam must harden properly. The manufacturer's information should be taken into account.
Tip:
The drill hole should be taped as tightly as possible. Otherwise, the foam residue must be removed with sandpaper. This increases the effort even further.
filler
After preparing the drill hole by filling it with foam, you can start filling it. Only a small amount is needed per hole. However, it is important that the mass is suitable for the type of plastic. Fine or plastic filler is optimal.
Requires:
- Sandpaper
- filler
- Spatula
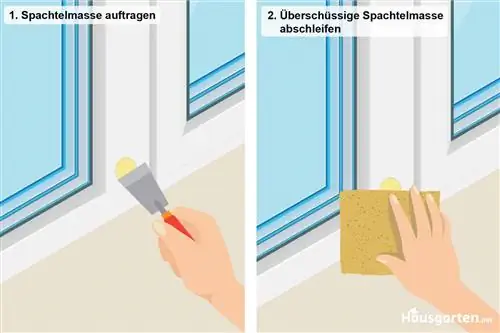
The procedure is as follows:
- After the foam has hardened, the filler is applied.
- The mass must be able to harden completely. The duration of this depends on the temperature, humidity and type of filler.
- To even out the surface, the excess filler must be removed. This is best achieved with very fine sandpaper.
As adjustment by sanding is required, it may be necessary to completely repaint the window frame. Otherwise, the transitions may still be visible. This could be due to the different colors.


