- Author admin [email protected].
- Public 2023-12-17 03:39.
- Last modified 2025-06-01 06:48.
In order to move sockets in the apartment or house, you don't necessarily need an electrician. You can do this yourself with a little bit of craftsmanship and the right tools. Essentially it involves drilling the holes for the cans in the walls. Above all, this requires meticulous work. You have to know that every single socket is in line with the respective power line, without which the socket would of course not receive any power. Consequently, the holes for sockets must always be integrated into the respective slots for the power outlets in the wall. And that's exactly what usually requires working with millimeter precision if you don't want it to pinch and tweak afterwards.
Tools needed
A drill is of course essential for drilling. The power that the machine must have depends on the material to be drilled into. Brick or concrete walls require significantly higher performance than, for example, walls made of wood or plaster. As a general rule, you can say that a drill should have at least 800 watts of power. When it comes to drilling holes for sockets in concrete walls, a minimum power of around 2,000 watts is required. Of course, an impact drill is ideal for this, as you can hardly go wrong with it. Much more important than the drill, however, is the appropriate drill attachment, also known as the drill bit. Basically, a circular attachment is used, which basically works like a type of saw. Which exactly that is depends on the material that is to be drilled into. A distinction is made between the following materials, for which the corresponding drill attachments are required:
- Brick and concrete walls - use attachments with a diamond wreath
- Wooden walls - use attachments with a metal wreath
- Plaster walls (gypsum plasterboard) - also use attachments with a metal ring
The drill attachment has a standard diameter of around 68 millimeters. This size is standardized and is therefore suitable for all cans available in stores.
In addition, to center the holes or to be able to determine the distances exactly:
- a ruler
- a spirit level
- a string
- a pencil
Determine distance
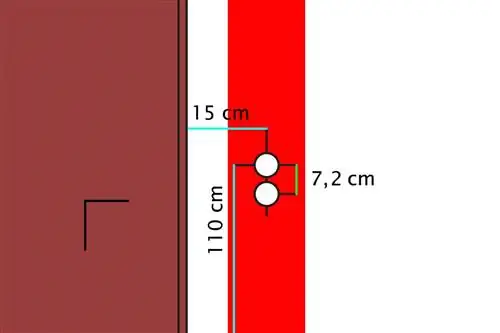
A ground-level socket is usually placed at a height of 30 centimeters above the ground. If the socket is to be higher, it is usually in the immediate vicinity of light switches. In this case the height is about 110 centimeters.
Tip:
It is important to determine the final height of the floor. If this height has not yet been determined in a shell of a building, we recommend consulting with the architect before placing the sockets.
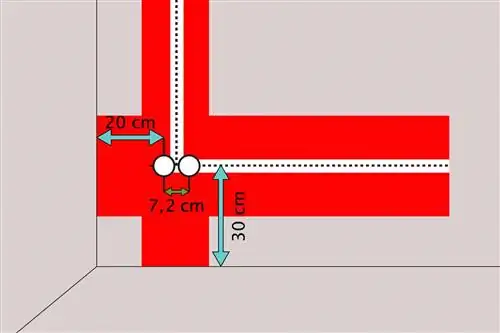
If no floor has yet been laid, you can assume that the flooring will have a total height of around five centimeters. The socket would then have to be at a height of 5 plus 30 centimeters=35 centimeters. By the way, the height is determined by measuring upwards from the floor with a ruler. Then make a small horizontal line with the pencil in the right place. If several cans are to be placed next to each other, i.e. in a row, the distance from the center of the can to the center of the can is usually 7.2 centimeters. These distances are also marked with a pencil line. To ensure that they are at the same height, it is advisable to use a spirit level and a string.
Tip:
Carefully measuring the distances is extremely important when placing the cans. You should take your time and work meticulously.
The distance to a door or window is usually ten to 15 centimeters. The measurement is taken from the outer edge of the door or window frame to the center of the socket.
Drilling the holes
Now it's time for the actual drilling. First, the correct drill attachment is selected and firmly attached to the drill head of the drill. The drill attachment must sit firmly and run smoothly. You should definitely test the latter in advance. There is usually a drill in the center of the circular drill bit. Place its tip at the marked point and start drilling. Important: For safety reasons, when drilling
- hearing protection
- safety glasses
- and respiratory protection must be worn.
Depending on the material, fine dusts are created that can irritate the mucous membranes and possibly cause eye injuries. When drilling, it is particularly important that the machine is kept as straight as possible, i.e. as perpendicular to the wall as possible, in order to achieve a clean result. It is therefore important to hold the machine with both hands to prevent the drill attachment from tilting while drilling. A certain amount of pressure is usually required to press the drill attachment onto the wall. It is also important to note that the drill hole is about one to two centimeters deeper than the flush-mounted box that is then inserted.
Fixing incorrect drillings
Incorrect holes in the socket holes occasionally occur, which should be remedied immediately if possible. There are basically two types of drilling errors:
- Center drill penetrates the wall
- Distance of the drill hole is not correct
Especially with very thin walls, it can easily happen that the center drill penetrates the entire wall and produces a hole that can then also be seen on the other side. This problem can be circumvented relatively easily. It's best to get a drill bit with a so-called depth limiter right from the start. This tool prevents drilling through relatively reliably. With some drill attachments, the center drill can also be removed. To do this, you should have drilled about two centimeters deep into the wall with the drill. This depth is usually enough to get an overall straight cut. The center drill can therefore be removed and then continued drilling without it.
It gets a little more complicated if you're fundamentally screwed up and the distances aren't right. Then the only thing that helps is to fill the failed drill hole again with standard filler or mortar and let it dry thoroughly. You can then start a new attempt.

