- Author admin [email protected].
- Public 2023-12-17 03:39.
- Last modified 2025-06-01 06:48.
Your own handcart will soon be used more often than you initially thought. Many do-it-yourselfers build the handcart themselves because they think it will only be used rarely. After a few trips, the practical piece also finds its job in your own garden at work. Owners of a fireplace stove will appreciate the small transport cart even more, because it transports a lot of wood from the shed to the house and also carts the briquettes. In order for the handcart to remain so versatile, it should be simple and flexible.
This is what you need
- Drilling machine
- Cordless screwdriver
- Forstner drill / countersink
- Wood drill
- Saw
- Sandpaper
- Range wrench/open-end wrench
- Screwdriver
- Brush
- Bottom panel birch plywood / multiplex panels 60 x 40 cm / 5 mm thick
- Side panels 2 x birch plywood / multiplex panels - 60 x 30 cm / 3 mm thick
- End panels 2 x birch plywood / multiplex panels - 40 x 40 cm / 3 mm thick
- Bar about 2 x 2 cm thick
- Lath about 3.5 x 3.5 cm thick
- Broom handle / strong rope / bar for handlebar
- Spax screws
- 4 wheels
- 2 axles / threaded rods
- U-clamps
- Washers and nuts
- Sleeves / spacer sleeves
- Acrylic varnish
Costs
First of all, many do-it-yourselfers naturally ask themselves why they should build a handcart themselves when there are so many models available in stores. The second question is, of course, which is financially cheaper, building it yourself according to our building instructions or buying a handcart made of wood or metal. One of the answers lies in the personal connection to the handcart. Your children are guaranteed to pass on the good piece that you built for them to their own children and grandchildren. You will certainly not develop this relationship and, above all, great pride with a handcart you have purchased. Nevertheless, in most cases a self-built cart is much cheaper than a purchased handcart.
So that you can accurately estimate the costs involved, we show different prices for the important materials in different versions:
- Set of 4 wheels - sack truck wheels with pneumatic tires - about 20.00 euros
- simple rubber wheels without air tube - 4 pieces from around 12.00 euros
- Axle 2 pieces - threaded rod with shaft - from around 15.00 euros
- Complete set of axles and wheels - from 38.00 euros
- Birch plywood - multiplex panels - 60 x 40 centimeters - 5 mm thick - about 3.80 euros
- Birch plywood - multiplex panels - 60 x 30 centimeters - 3 mm thick - about 2.70 euros
- Spax screws - 100 pieces 3.5 x 40 mm - about 4.00 euros
- Pull rod - homemade with broom handle and wooden hanger - about 2.00 euros
- Drawbar bought ready-made - from around 20.00 euros
Tip:
With pneumatic tires you have significantly better suspension in your handcart. However, you also have to fill the tires with air before almost every use. Unfortunately, pneumatic tires always lose pressure over time, especially if the vehicle has been left in the shed for a while. However, with unsprung hard tires, you'll shake your Father's Day beer so hard that it will either blow up on its own or foam over when you open it. Even children who sit part of the way in the handcart will not survive the journey without bruises if you choose the hard tire variant.
Building instructions handcart
Since the handcart only gradually shows its true qualities, you should not have too narrow an idea of the construction plan for building it yourself. A cart that exactly fits a certain type of beer crate will not be nearly as practical as a slightly more spacious model that comes from more of a universal blueprint. Therefore, your first step should be to adapt the construction plan from our construction instructions exactly to your dimensions if you do not want to use it exactly. But don't make your model too small so that the handcart remains practical.
Tip:
For a simple handcart that may actually just be used to carry firewood through the garden, a simple old box is usually sufficient. For example, a large apple or potato crate is well suited for such a cart. The same robust pneumatic tires can also be installed underneath. A simple smaller fruit box also works well if you want to make a small handcart for a child to play with. This means that the work will not be completely self-made, but with a little paint this model can also be designed very individually.
Cutting wood - smoothing edges

Depending on the size, you may not need to saw the side panels and the base at all, as the appropriate panels are often available in different sizes in every hardware store. Otherwise, a lot of the wood will be cut to fit exactly for you. You should still round off the edges a little with sandpaper. The front side and the rear panel must be bevelled so that it later fits exactly between the strips on the side panels. You should also saw the slats that run across under the handcart. These must protrude so far on the sides that the side struts can be screwed onto them. The upright side struts must be sawn off at an angle of around 30 degrees at the bottom. This will help you hold the side plates at the right angle later.
Tip:
If you are still a little unsure as a beginner, it is better to only saw the front and rear panels once you have attached the upright struts that hold the side walls.
Pre-drill and countersink holes
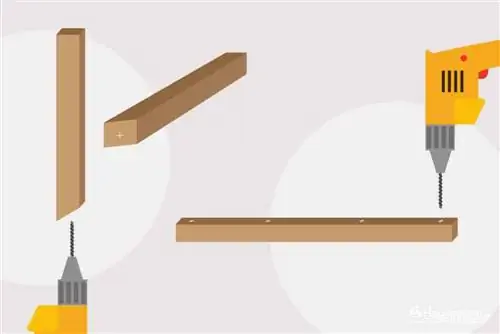
Try to pre-drill all holes and countersink them as easily as possible. To pre-drill, use a very thin wood drill. The wood drill should be no more than three millimeters thick. This is not always easy with thin panels, so you have to work carefully with the Forstner bit. The side struts should be pre-drilled from the slanted underside. The hole should be made in the middle of it. The crossbars must also be pre-drilled so that the long screws can be inserted there.
Screw the crossbars and side struts
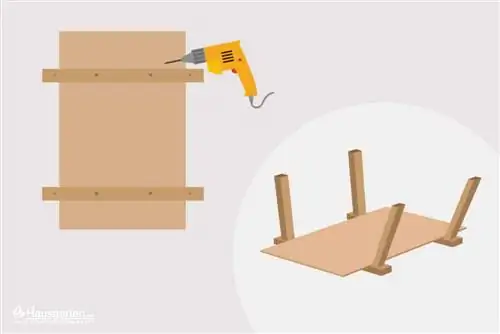
The correct length of the screws depends on the thickness of the slats and the birch plywood. You will need a long, thin Spax screw for each of the four side struts. The crossbars are screwed under the floor. Then place the side struts on the crossbars and screw them from below.
Tip:
Instead of wooden side struts, you can also use short pieces of pipe. However, you then have to secure these with split pins in the crossbars. In this case, the side panels would either be left ajar or screwed together in a U-shape with small pipe clamps.
Mount the wheels and axles under the floor
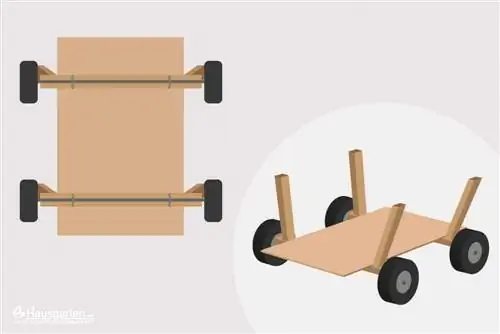
The easiest way to mount the axles are U-shaped pipe clamps. Some construction instructions describe fastening made of multiplex. But over long distances, the wood will quickly fall out and the handcart will no longer run smoothly. The U-clamps are attached to the crossbars. A threaded rod with spacers, sleeves and washers is then pushed under the carriage. Make sure that there is a sleeve under each U-clamp so that the axle does not rub against the wood. The wheel with the corresponding sleeves is placed on the outside of the axle and secured with washers and a cap nut.
Tip:
You can of course also use real axle bearings and axle shafts. Especially if you really frequently travel long distances, the investment can actually be worth it. This is not always absolutely necessary for casual use.
Build the drawbar and handle
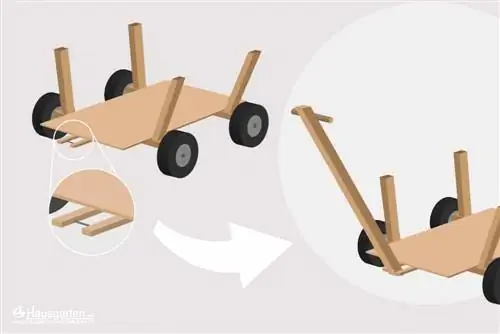
A small, thin slat or broom handle is ideal as a handle for the handcart. Screw the middle part of a wooden hanger onto it at the top end. This means that the handle will sit comfortably in your hand, even on long journeys. Two small pieces of the slat are screwed to the front of the base plate. These should be mounted at a distance approximately equal to the width of the handle bar. The handle bar is then secured between these slats with a small threaded rod. Don't forget the discs here too so that the wood doesn't scrape on the wooden rod. Cap nuts should also be placed on the outside here. Grease the rod well.
Tip:
If you want the handcart to be easily stowable, the long handlebar can usually be a bit annoying. Instead of the pole, you can simply attach a thick rope to the handcart. This may not be entirely stylish, but it is still very comfortable and easy.
Screw the strips onto the side panels
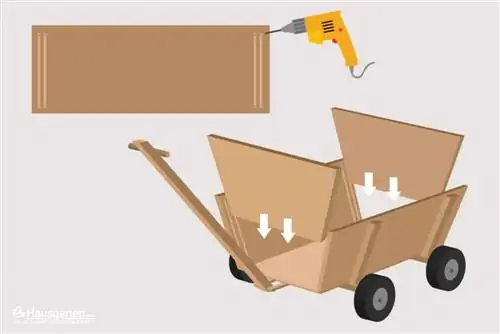
Two narrow strips are screwed vertically onto the side panels from the inside at the back and front. The distance between the strips should be slightly more than the thickness of the front and rear plates. These will later be inserted between these strips. The side panels are then screwed onto the upright struts.
Tip:
If you prefer to work with glue, you can simply glue the strips on. Ultimately, the strips are only intended to hold the two end plates. If you want to install a small bench for the children in the handcart, you will also need a bar across each side wall. However, it cannot be glued, otherwise the children would collapse with it. A seat board is placed over these strips, which you can easily remove if necessary.
Painting handcarts
It is not absolutely necessary to paint the handcart, but the wood will stay beautiful for longer. After all, the weather isn't always nice when you're out and about. Dirt also tends to splash against the unprotected wood. If you want to preserve the wood grain, you should use an acrylic-based clear coat. However, a handcart in particular can also be painted colorfully and brightly.
Tips for speed readers
- Adapt construction plan to your own wishes
- Cutting wood and sanding edges
- Pre-drill and countersink holes
- Screw the crossbars and side struts to the floor
- Attach U-shaped pipe clamps to crossbars
- Mount the wheels and axles to the floor
- Build the drawbar from slats and screw it under
- Build a tie rod from a slat and a wooden bracket
- Screw the strips onto the side panels
- Screw the side panels onto the upright struts
- Insert the front and end plates between the strips
- Screw child seat strips onto side panels
- Place the seat board on the slats
- possibly paint a handcart


