- Author admin [email protected].
- Public 2023-12-17 03:39.
- Last modified 2025-01-24 12:45.
Pinching out tomato plants is a simple measure to get more and larger fruits. However, it also has other advantages. However, many hobby gardeners shy away from it and fear removing the wrong shoots or causing damage to the plants. With our instructions, these dangers do not exist.
Varieties
Not all tomato plants need to be pinched out. For example, it is unnecessary for vine and bush tomatoes. These plants remain compact anyway and are therefore also suitable for cultivation in containers. In stores they are often listed under the following names:
- Cocktail tomatoes
- Party tomatoes
- Bush tomatoes
- Date tomatoes
- Mini tomatoes
- Cherry tomatoes
These are varieties with small fruits, although the plants usually remain small.
Reasons for austerity
Increased yield is often cited as the main reason for thinning out tomato plants. If stingy shoots are removed, the strength of the plant is concentrated in the main shoot and strong, fruit-bearing side shoots as well as the formation of larger fruits. Stingy shoots can also bear buds and fruit. However, the fruits often remain very small and do not always ripen.
As mentioned, thinning out tomato plants also has other advantages. These include:
Reduced risk of damage
The fruit can make stingy shoots very difficult. This makes tomato plants more susceptible to damage from wind and rain. Parts of the plant can break off and even the main shoot can break. Thinning makes the plant lighter, straighter and more stable.
Easier care and control
Stingy shoots create very dense foliage. This makes tying the plant just as difficult as checking for diseases or parasites. The airier growth after thinning out makes these measures easier.
Lower risk of disease
The densely growing and standing leaves due to stingy shoots reduce ventilation. The leaves stay moist longer and diseases and parasites can spread more easily to and between them. Thinning out not only makes inspections easier, it also reduces the risk of infestation with pathogens and pests.
Faster and easier harvesting
After thinning, the fruits are visible more quickly and are easier to remove - due to the stronger light, they can also ripen in a shorter time.
Time
Pruning out the tomato plants can start very early. As soon as the plants are placed in the bed, the shoots can be removed for the first time. It is even advisable to carry out the measure as early as possible. Because this creates the following advantages:
- smaller wounds and therefore lower risk of penetrating germs
- Plant wastes less energy on the growth of stingy shoots
- Stability is maintained more consistently
- Measure can be carried out faster and easier
However, it is not enough to thin out the tomato plant just once. The plant will continually develop new stingy shoots. Therefore, it should be checked once a week for new shoots and these should be removed immediately.
It is therefore important to start and continue the austerity early - but also to choose the right time for it. A warm and dry day is ideal. Removing the shoots creates small wounds or cut surfaces on the plant. As long as these are still moist and have not closed, germs can penetrate them. In dry weather, open wounds close more quickly and the risk of invading pathogens is reduced.
Tip:
If thinning is carried out regularly, identifying the stingy shoots is very easy and more energy is channeled into the development of buds and fruits.
Identifying miserliness
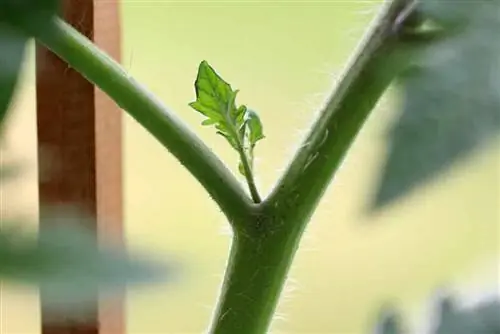
The biggest concern of many hobby gardeners is removing the wrong shoots when pinching out the tomato plant - because they cannot correctly recognize the starving shoots and distinguish them from others. However, this concern is unfounded, because even inexperienced gardeners will be able to easily recognize stingy shoots and distinguish them from the main and side shoots.
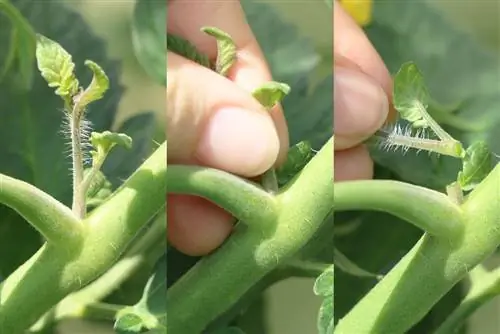
Departing from the main shoot, which is also known as the trunk, there are side shoots. These bear buds and fruit. The connection between the trunk and the side shoots, i.e. the areas where the side shoots emerge from the main shoot, are called leaf axils. Stingy shoots grow exclusively in these leaf axils and not directly from the main shoot or a side shoot. If this is taken into account, there is no risk of accidentally removing a side shoot.
Instructions
The following tools are required for thinning out the tomato plants and then securing them:
- Thumbnail or small scissors
- Plant stick or trellis
- Wire, twine or plant clips
Pruning out tomato plants is very easy if the following steps are taken into account:
1. Control
The leaf axils of the tomato plant are checked for stingy shoots from the tip to the ground.
2. Exhausted
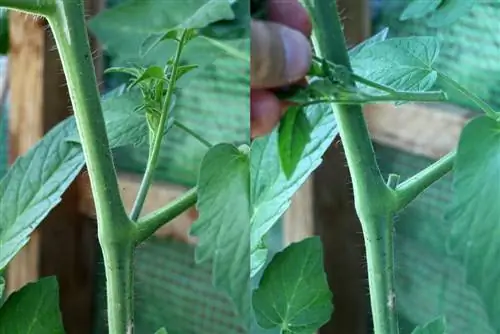
If there is a stinger shoot between the main shoot and a side shoot, it is clipped off with your thumbnail directly at the connection to the plant or removed with small scissors. Larger stingy shoots have a kind of predetermined breaking point. If they are bent to the side with slight pressure, they simply break off. To stabilize, the main shoot should be held.
3. Save
Since the tomato plant can channel more energy into the growth of the trunk and side shoots after thinning, it often quickly gains height, buds and fruit after the thinning shoots are removed. To ensure that this additional height and weight does not cause individual parts to break off, cause the plant to grow sideways or tip over, it must be secured accordingly. For this purpose, a stabilizing plant rod or trellis should be used - ideally when planting - and the plant should be attached to it. Wire, twine or plant clips can be used for fixation. After each thinning, additional fixations should be placed. A distance of ten centimeters is recommended.
Although pinching out tomato plants basically just involves recognizing and removing the shoots, the subsequent securing of the plants should not be neglected. Otherwise, wind and rain could still cause damage to the tomato plants.
Tip:
If scissors are used, they should be thoroughly cleaned or disinfected before and after use. Otherwise, germs could be transferred to the plant's wounds via the blades and increase the risk of disease. If the thumbnail is used, this of course also applies.
Propagation
The shoots removed during thinning can be added to the compost or used to ward off pests while they dry. However, it is also possible to grow new tomato plants from it. To do this, shoots that are around ten centimeters long are simply stuck directly into the ground. Shorter shoots should first be placed in a glass with a little water for a few days so that they can develop roots. If the shoots are used as cuttings early on, the resulting tomato plants can even bear fruit in the same year.
Is stripping necessary?
Particularly among hobby gardeners, there is always a debate about whether it really makes sense to prune. Some people swear by it because of the benefits mentioned. Others have reliable returns even without this measure. As always, trying is better than studying.
Tip:
As a test, strip out a tomato plant and leave it on a shoot. This shows very directly whether the selected variety benefits from removing the stingy shoots.

