- Author admin caroline@plants-knowledge.com.
- Public 2023-12-17 03:39.
- Last modified 2025-01-24 12:45.
Some perennials, especially evergreen species such as knapweed or penstemon, but also perennial leafy plants such as rue and chamomile, are propagated with head cuttings.
Unwoody head cuttings
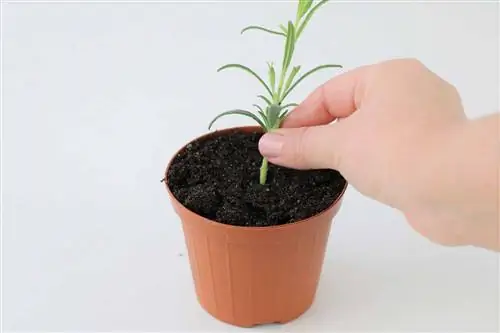
Take cuttings about 7.5-10 cm long, each with at least three leaf nodes, from the tips of strong, leafy sprouts in late summer or early autumn. Cut them straight below the lowest leaf node with a sharp knife or a razor blade and remove them the two bottom leaves. The cuttings are then placed in a flower pot that is filled with potting soil or a mixture of one part peat and one part coarse sand; a 10cm pot holds about six cuttings.
Use a pencil to drill small planting holes into the substrate. Insert the cuttings so that the leaves remain above the soil, then press them down with your fingers. The substrate is then watered well from above, the cuttings are marked and a transparent film is placed over the pot, which is secured with a rubber band. To ensure that the cuttings do not come into contact with the foil, it is best to make a frame out of bent floral wire before placing the foil. The cuttings are rooted in a shady location in a cold frame or in a propagation bed with a constant temperature of 16 °C.
After 4-6 weeks in the cold frame or 3 weeks in the propagation bed, the cuttings should have formed roots. You can check this by gently pulling on the plants. When roots have formed, you can remove the film or take the pot out of the propagation bed. Finally, very carefully pull the rooted cuttings out of the soil and plant them in 7.5 cm pots with suitable potting soil.
The young plants are pressed firmly, placed in a shady cold frame and watered abundantly; the irrigation water should be able to drain easily. Cut off the growing shoot tips of these young plants after about 1 week to promote strong root growth.
Tip:
The plants are kept in a closed cold frame over the winter and are only planted outdoors in the spring as soon as the danger of frost has passed.
Unwoody partial cuttings
Most perennials with tuberous roots, such as B. oxtongue, delphinium, sunbride, carnation, lupins and scabioses can be propagated not only by division but also by young shoots.
To do this, first cut off some of the basal, young shoots below the base of the leaves by approximately 7.5-10 cm. Place these cuttings directly in the cold frame or in 7.5 cm pots filled with a peat-sand mixture.
Spray the cuttings with water from above and always keep the cold frame closed. As soon as the cuttings sprout, begin to ventilate for longer and longer periods of time. After about 6 weeks, the cuttings are planted individually in 9 cm pots and outdoors in autumn.
Semi-woody shoot cuttings
Many shrubs and trees such as ray pen, orange flower, beard flower or lavender can also be propagated from cuttings in summer. Semi-lignified cuttings are taken from annual shoots that are already slightly lignified at the bottom, but are still in the growth phase at the top and are therefore green and unwoody. Such cuttings are taken in mid to late summer. This type of propagation requires little maintenance until rooting, as you need a suitable propagation bed and carefully control the water supply and shading. Only after 1-2 years can the plants be placed in their intended location outdoors.
The approximately 15-20 cm long side shoots of the same year are suitable as cuttings. The cutting is cut close to the main shoot with a knife or secateurs. Then remove the lower part of the shoot and cut off the shoot below the first leaf node. The large shoot tip is removed above a leaf so that the cutting is 5-10 cm long.
Axillary cuttings
Semi-woody cuttings often root better if you leave a piece of the main shoot attached. Some species, such as firethorn, do not develop roots without this “appendage”. The axillary tissue promotes root formation because it contains highly dividing cells.
First, the main shoot with several side shoots and, if possible, no flowers is cut off and then cut diagonally below a side shoot with a sharp knife. With the same cut from top to bottom, the side shoot including the armpit tissue is separated from the main shoot. These cuttings should be about 5-7.5 cm long. Longer shoots should be shortened from the tip.
Tip:
For plants that are difficult to propagate, you should take several cuttings.
All cuttings, whether with or without armpit tissue, root best in a suitable growing substrate, e.g. B. a mixture of peat and sand. A 7.5 cm pot can be planted with around five cuttings, a 12 cm pot with around ten cuttings.
The cuttings are placed in the substrate up to a third of their length, pressed firmly and watered well with a fine spray attachment. They require a constantly moist environment, so we recommend constructing a wire frame and then covering it with foil. If you have larger quantities of cuttings, they are better stored in a suitable box, also covered with foil. The trade offers heated propagation beds for this purpose, but they are usually quite expensive.
The growing substrate should be kept at a constant temperature of 16-18 °C for most winter-hardy plant species. The majority of cuttings also root in unheated substrate, although this takes longer.
Once roots have formed, the cuttings must slowly be acclimated to the drier or colder outdoor environment and hardened off. The film is either lifted slightly or perforated to allow air to reach the plants; Excessive light should be avoided if possible. The plants must never dry out.
Leaf cuttings
If you want to grow several new bushes from just a few mother plants, propagation from leaf cuttings is a recommended alternative, because leaf cuttings often thrive better than other cuttings.
Leaf cuttings are taken in late summer or early autumn from semi-lignified side shoots that were formed in spring. Each shoot should have several leaves and a bud in each leaf axil.
Separate the shoots with secateurs and then cut them with a sharp knife about 2 cm above and below a leaf node, whereby the upper cut should be straight and the lower cut should be diagonal. In this way you will get three or four leaf cuttings from one shoot. The bark of the cuttings is scratched slightly with a knife and the ends and the wound site are dipped in a rooting agent.
Then place the cuttings in substrate-filled pots. The buds should lie just above the substrate surface. An 18cm pot holds approximately twelve cuttings.
For camellias, the leaf cutting should consist of just one leaf node with one leaf and one shoot. Plant these cuttings in the substrate so that only the top leaf is visible.
All leaf cuttings are sprayed lightly with water after planting and then placed in the cold frame.

