- Author admin caroline@plants-knowledge.com.
- Public 2023-12-17 03:39.
- Last modified 2025-01-24 12:45.
Making a sundial is a science in itself. The seemingly simple construction is sometimes not that easy to implement because a whole lot of technical and scientific facts have to be taken into account. There is no universally valid sundial. Each example must be precisely tailored to the location where it is erected so that it can actually tell the correct time. Below you will find two different building instructions for a sundial: a very simple, easy-to-use version and a sundial for advanced users.
Simple sundial for beginners
A functional sundial can be made even without any basic technical knowledge. It's so easy that even children can build this sundial.
Material
- large flower pot (at least 30-40 cm in diameter)
- Stick or metal rod (length about 50-60 cm)
- Pebbles or grit
- waterproof pen
Construction
Although this method is very time-consuming, it is very easy to carry out and requires no prior knowledge or technical understanding.
- Place the flower pot in a sunny spot in the garden
- Place the rod in the middle of the flower pot and fill it with pebbles or grit
- the rod must protrude at least 30-40 cm from the chippings
- every hour on the hour mark the spot on the edge of the flower pot where the shadow falls
- possibly continue marking the next day
Tip:
Alternatively, a large stone slab, a wooden board or a metal disc can also serve as a sundial, into which a rod is inserted in the middle. Thumbtacks, glued-on stones and much more are also suitable for marking the hours.
Sundial for advanced users
A sundial should be made of weatherproof material so that it can be left outdoors in summer and winter and in rain and snow. There are no limits to your imagination when it comes to choosing materials. A sundial can be made of wood, metal, stone or even plastic. It is important that suitable tools are available for processing the materials.
Material
- three wooden boards, about 20 x 25 cm (preferably 3 to 4 mm thick)
- Fretsaw
- large set square, longest side 22 cm (or other protractor)
- Compass (minimum diameter 20 cm)
- pencil
- Compass
- Paint or glaze for painting
Cut out the clock face
The clock face is made from one of the boards. It can be cut out round or square.
- Square: edge length 20 cm
- Circle: diameter 20 cm
To make a circle, it is best to first draw a square with an edge length of 20 x 20 cm on the board. Alternatively, the board can be cut to this size straight away. To mark the center, two diagonal lines are drawn from the corners. Where the lines meet is the center of the square. The tip of the compass is inserted into this point and a circle with a diameter of 20 cm (radius corresponding to 10 cm) is drawn. Then cut out the circle with the fretsaw or just trace it and leave the board as a square.
Label the dial

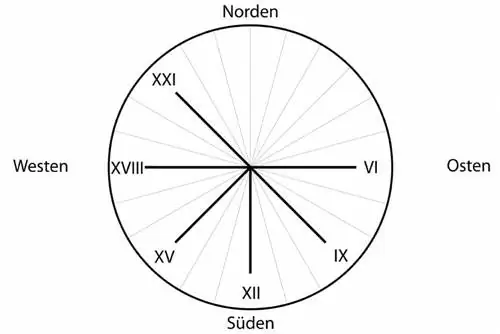
The circle is divided into 24 equally sized cake pieces using the set square and a fine pencil. So lines are drawn from the edge through the center. All divisions must have an angle of 15 degrees. Each of the lines marks a full hour. Theoretically all numbers can be plotted. The sundial looks more professional if only the actual hours of sunshine (i.e. from around 6 a.m. to 9 p.m.) are recorded. In addition, the dial appears less cluttered if it is only applied every third hour (6, 9, 12, 15, 18 and possibly 21).
Determine latitude
Now it gets a little more complicated, because in order for the sundial to work correctly, it has to be aligned with the earth's axis. One edge of the triangular shadow caster must be parallel to the earth's axis. To do this, you need to know at what latitude the place where the sundial is to be set up is. The latitude runs parallel to the equator, Germany lies between the 48th parallel in the south and the 54th parallel in the north.
Examples for orientation:
- 48. up to 49th parallel: Freiburg, Stuttgart, Ulm, Munich, Passau
- 49. up to 50 degrees latitude: Saarbrücken, Karlsruhe, Mannheim, Nuremberg, Würzburg
- 50. Latitude: Frankfurt am Main, Wiesbaden, Mainz
- 51. Latitude: Cologne, Erfurt, Dresden
- 51.-52. Latitude: Dortmund, Kassel, Leipzig, Magdeburg
- 52.-53. Latitude: Osnabrück, Hanover, Berlin, Bremen
- 53.-54. Latitude: Hamburg, Schwerin, Rostock
- 54.-55. Latitude: Kiel, Flensburg
Tip:
With a GPS-controlled compass app you can determine your position very precisely and this is often available for free as a small program. Or, in the classic way, you take an atal or map and read your latitude there.
Crop shadow caster

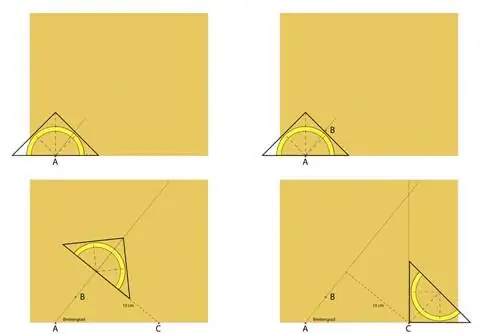
The latitude is one of the angles of the triangle that makes up the shade. This angle is now drawn on the second board using the set square. To do this, turn the board so that the long side is at the bottom. The set square is placed so that the centimeter scale points downwards. The scale should line up with the board at the bottom. The set square is now pushed so far to the left that the zero point (A) of the scale is approximately in the left third of the board side.
- Mark the zero point with a fine pencil line (point A)
- read the appropriate angle from the bottom right side of the board
- mark with a dot (point B)
- Draw a connecting line between points A and B
- the angle opens to the right
- Replace the set square to the zero point (the zero on the scale at point A)
- Rotate the set square to the right until the 90 degree line is on the connecting line between points A and B
- now push the set square upwards until a distance of 10 cm is reached from the edge of the board (on the right side), mark point C on the edge of the board
- draw the 10 cm long line with the pencil
- draw a line vertically upwards from the end point of the 10 centimeter line (point C)
- mark the point where this line meets the angle (between points A and B)
- If necessary, extend the line between A and B
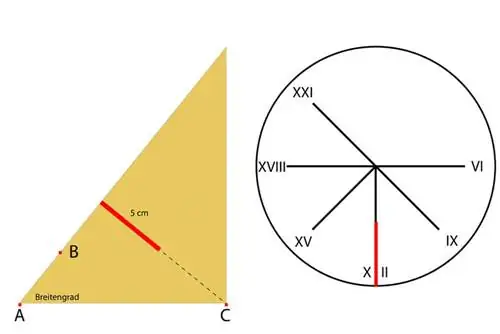
- A right-angled triangle is created with the right angle at the bottom right
- Cut out the triangle with the jigsaw
Tip:
If you are unsure whether you are doing everything right, you can first make the sundial as a model out of cardboard.
Assemble the dial and shadow caster
The dial is not placed flat on the floor, but is installed in the shadow caster at a slight angle. In this way, the deviation caused by the curvature of the earth is compensated for.
- Saw the dial at the 12 o'clock mark five centimeters deep and the width of the board (3 or 4 mm)
- Saw the triangle at the 10 centimeter line (from the longest side) 5 cm deep and 3 (or 4) mm wide
- put both parts together (right angle of the triangle meets the 12 o'clock mark)
- possibly glue if the cutouts are a little too big
- both parts must fit tightly together

Assemble the base plate
The base plate of the sundial is now created from the third wooden plate.
- Size: 20 x 25 cm
- A 25 cm long line is now drawn in the middle of the long side
- Turn the plate with the long side down
- mark the left end of the line with S (south)
- label the right end of the line with an arrow and N (north)
- measure 5 cm on the board from the right side of the board
- draw a line through the point (perpendicular to the north-south line)
- this line marks the west-east line
- Align the dial (with shade) with the numbers facing north
- set up with the bottom side (12 o'clock) exactly on the east-west line
- fix with small nails or screws
Set up the sundial
So that the time can be displayed correctly on the sundial, the arrow on the base plate must point exactly north. The compass is needed for this. The solar time can now be read from the shadow that the triangle (shadow source) casts on the dial.
Suntime
If you use a sundial, you shouldn't be surprised if this time differs slightly from the time shown by our clocks. The zone time is displayed on normal clocks. In Germany, for example, Central European Time (CET) applies. Although Spain's capital Madrid is about 2,500 km further west and the sun only reaches its highest point an hour and a half later than in eastern Budapest, 12 noon is displayed at the same time in both cities.
Conclusion
Building a simple sundial is possible using a flower pot or a disk into which a rod is inserted vertically, which casts shadows on it at certain hours of the day. Now all you have to do is make a mark for each hour. Professional sundials also take into account the earth's axis and the latitude of the location on which the sundial is located.


