- Author admin caroline@plants-knowledge.com.
- Public 2023-12-17 03:39.
- Last modified 2025-06-01 06:48.
Planting your own vegetables in the garden bed and harvesting them later is not that difficult. Growing the various vegetable plants is very easy in peat pots, which then only have to be planted out in the garden bed at the right time. A wide range and a large selection of seeds from different types of vegetables are available from selected specialist retailers. But you can also use your own seeds from the previous year's harvest, for example from tomato, pumpkin or pepper plants.
Peat pots - definition
Peat pots are available in well-stocked specialist retailers; these are pots that consist only of natural ingredients, in this case pressed peat. They are filled with potting or growing soil into which the seeds are placed. The pots are then placed together in larger cultivation bowls. This way they can be watered without water leaking. However, the pressed peat continues to retain its shape even when moist. Peat pots are intended as a growing aid for plants and have the following advantages over conventional plastic growing pots:
- If the seedling is ready to be planted, it does not need to be removed from the peat pot
- The pots are placed in the prepared planting hole
- the roots can find their way through the swollen peat walls
- the peat walls rot into the earth over time
- This will ensure that the young seedling is not damaged when planted
- So-called planting shock, which many young plants suffer when planting, is also prevented
- the plant will grow faster and stronger in the new location because it does not lose its familiar environment
Tip:
If peat soaking pots are used, they are already mixed with plant substrate and are commercially available in tablet form. The spring pots are softened in water and can be used immediately for sowing. These can also be planted together with the seedling later.
Growing trays
The seeds are sown in the peat pots, which find their place in the seed trays. The cultivation trays are flat planters that usually have a clear cover that ensures sufficient light and constant moisture and warmth inside the tray. The increased humidity promotes seed germination. The cultivation trays can also be located in the home, for example on a windowsill. When growing vegetable plants in peat pots or peat soaking pots in a seed tray, the following must be taken into account:
- Growing trays in the apartment must be covered as the often dry room air could be harmful to the seeds
- if located on a windowsill, the hoods must be opened more frequently
- If there is strong sunlight, too much water will evaporate from the earth
- condensation forms on the cover
- There is also a risk of heat build-up
- these two factors can promote fungal diseases
- A pen or similar object clamped between the cover and the edge of the bowl improves the air circulation inside
- In later spring, when it is warm enough during the day, the seed trays are temporarily taken outside
- this has the advantage of hardening the young seedlings
- The cover should be completely removed after a while when the young vegetable plants have got used to the new climate
Tip:
Planting trays in various sizes made of inexpensive plastic are available at hardware stores or garden centers. Some retailers already offer a combination of seed trays and peat pots.
Sowing
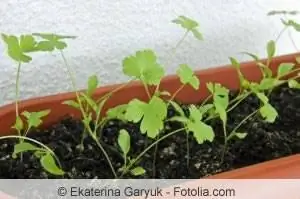
Seeds lose their ability to germinate over time, so it makes more sense to only use fresh seeds. If you still have old seeds from the previous year, you can also check them for germination. To do this, the seeds are treated with pre-germination procedures before being placed in the peat pots. Since there are different germinators, for example cold germinators or dark germinators, these processes are also very different. If the seeds are fresh and have germination potential, they go into the peat pots. The hobby gardener can choose between simple peat pots or peat soaking pots. Both are equally suitable for cultivation and are later planted together with the young plant. Another advantage is available to the hobby gardener. The vegetable plants sown in peat pots do not need to be pricked out or transplanted into larger pots. The young plants are given plenty of space in the peat pots to spread their roots, as they can pierce the peat walls unhindered. When sowing, proceed as follows:
- Use a sowing calendar for vegetables to determine which vegetables should be sown and when
- Fill peat pots with potting soil, not required for peat soaking pots
- use as many peat pots as desired vegetable plants
- only one seed goes into every peat pot
- Depending on whether they are light germinators or others, the seeds have to be inserted at different depths
- Put peat pots in seed trays
- then proceed as described under “Growing trays”, continue
Tip:
Since every vegetable has different requirements and requirements when sowing, every vegetable garden owner must also be well informed in advance about the individual types of vegetables that should be grown in peat pots.
Watering & Fertilizing
The peat pots with the seedlings must be kept moist without causing waterlogging. There is no need to fertilize because the potting soil filled into the peat pots already contains all the nutrients the seeds need to germinate and sprout. Peat soaking pots, on the other hand, already consist of a peat and potting soil mixture, so fertilization doesn't make sense here either.
Tip:
To avoid waterlogging in the growing trays, they can be provided with holes in the bottom through which excess water can drain. The cultivation trays are then placed on another tray, which can be regularly drained of excess water after watering.
Plants
When the seedlings have grown strong enough, they can be transplanted to their final location. You have to pay attention to the calendar because not every vegetable is planted at the same time. The planting time is therefore very different for the various new vegetable plants. When actually planting, the following must be taken into account:
- Find a suitable location for the various vegetable plants
- Dig a planting hole big enough, pay attention to the distance to the other plants
- Prepare soil with compost or vegetable fertilizer
- place new vegetable plant with the peat pot in the prepared hole
- so the delicate roots of the small plants are not damaged
- spread prepared soil around the plant, press lightly and water
Tip:
By growing in peat pots, many vegetable plants can be planted quickly. In this way, the new plants can be quickly placed in the prepared planting holes, which saves a lot of time.
Care errors, diseases or pests
Some things can also go wrong when growing in peat pots. If the seedlings are kept too wet or too cold, they will not germinate and, in the worst case, no new vegetable plants will grow. You also need to pay attention to the cover over the growing tray, because if condensation forms here or if it is too warm overall under the cover, then fungal diseases can quickly form, which prevents the young plants from germinating and growing. Another reason why the seeds do not germinate could also be old seeds that have lost their ability to germinate. Other diseases or even pests generally do not occur when growing vegetable plants.
Conclusion
If you don't want to cause any damage to your small new vegetable plants when planting them, use peat pots. The seeds are sown in the same way as in conventional seed pots, but the peat pots are planted in the new location together with the young seedlings. In this way the roots are protected. Later, the peat pots rot in the ground, the now longer and stronger roots of the vegetable plants find their way through the peat walls and can grow well. If you grow a lot of vegetable plants in this way, you save a lot of time when preparing for planting. Because there is no need to prick out the seedlings and repot them in the meantime and when planting, the entire pot is just removed from the seed tray and placed in the prepared planting hole.

