- Author admin caroline@plants-knowledge.com.
- Public 2023-12-17 03:39.
- Last modified 2025-01-24 12:45.
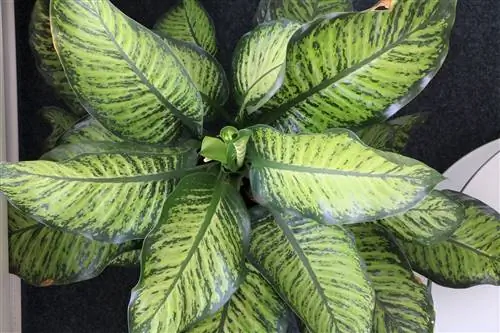
With a Dieffenbachia, a concentrated load of tropical opulence finds its way onto every window and flower sill. The powerful ornamental leaf plant with its elegantly marbled foliage has firmly established itself in the ranking of the most popular house plants, not least because of its undemanding nature.
A minimum of gardening skills is enough for Dieffenbachia to feel at home. The following lines explain in more detail which aspects are relevant if you want to plant, care for and propagate the arum plant perfectly.
Plants
It is recommended to plant a Dieffenbachia in a larger pot immediately after purchasing it. As a rule, the fast-growing plants in the garden center are in pots that are far too narrow, which prevents them from developing magnificently on your windowsill. Choose a planter that is about 2 inches larger in diameter. This volume should be sufficient for at least the first year of operation. High-quality compost-based potting soil is suitable as a substrate, ideally enriched with a little leaf mold, peat and coconut fibers or perlite. A handful of sand also improves permeability.
- Drainage over the water drain in the ground prevents harmful waterlogging
- Suitable material is grit, pebbles or crushed pottery shards
- spread a water- and air-permeable fleece over it
- fill in a 2-3 cm high layer of substrate
- insert the potted dieffenbachia in the middle
While holding the plant with one hand, fill all the cavities with potting soil with the other hand. The substrate ends a few centimeters below the edge of the pot so that water does not spill over during care.
Tip:
Dieffenbachia are highly toxic. Always wear gloves and eye protection when carrying out all work related to planting, care and propagation.
Location
In its South American homeland, poison aron thrives in the twilight of the tropical rainforest. If you choose the location with this impression in mind, you will definitely make the right decision. The foliage plants feel at home in these locations:
- bright to partially shaded lighting conditions
- ideally on an east, west or north window
- shade in direct sunlight
- optimal temperatures from 18 to 25 °C
- consider the minimum temperature of 15 °C
A humidity of 70 to 80 percent is considered a basic requirement for successful cultivation. Knowledgeable hobby gardeners therefore like to place the tropical plant in the warm, humid bathroom. In other rooms, humidifiers, bowls filled with water or indoor fountains create the desired climate.
Tip:
To provide Dieffenbachia with adequate humidity, fill the saucer with pebbles and water. This means the plant is always wrapped in a warm, moist cloud.
Watering and fertilizing
The regulation of the water and nutrient balance takes into account an intensive vegetation period in spring and summer as well as a rest phase in autumn and winter. How to reconcile your needs:
- water abundantly from April to September/October
- if the thumb test shows a dry substrate surface, water is applied
- reduce watering from November onwards without letting the plant dry out
- fertilize liquid every 14 days from March to August
The Dieffenbachia is grateful for a fine shower of lime-free water all year round. Wiped regularly with a damp cloth, the beautiful leaves shine with a fresh shine and at the same time absorb important moisture. If possible, you should avoid disturbing the tropical beauty with hard, cold tap water. With collected rainwater, you can put green plants in better shape.
Cutting
Over time, they assume majestic proportions, which further increases the fascination of Dieffenbachia. Since the available space is sometimes overused at the same time, the excellent cutting tolerance is very helpful for successful care. Pruning is advisable at the latest when the mighty shoots begin to go bald. To do this, use a sharp, meticulously disinfected knife. Also take precautions to ensure that you do not come into contact with the poisonous plant sap. Even after a radical rejuvenation cut, a Dieffenbachia will sprout again to a height of 10 cm with good care.
Propagate
Once you own a Dieffenbachia, you can grow additional specimens using simple propagation techniques. After each pruning, there is an abundance of material available for this purpose. If you keep your eyes open when repotting, there are practical nurseries to discover from which young plants can also be grown. Choose from the following variants:
Shoot cuttings
The perfect candidates are laterally branching shoot cuttings that have several leaves and are 10-15 cm long. Cut these off 2-3 mm below a leaf node. The cut on the mother plant is sealed with charcoal ash. How to proceed:
- fill a small pot with peat sand, perlite, coconut fibers and potting soil
- insert a cutting into each, spray and water
- spend in a heated mini greenhouse or put a plastic cover over it
An average temperature of 25 °C is required for rooting to begin. Under the influence of a warm, humid microclimate, the first tender roots thrive after 3-4 weeks. A new shoot signals that the process is successful. As soon as the cultivation pot is completely rooted, transplant the young Dieffenbachia into normal substrate for adult specimens.
Tip:
If the tips of Dieffenbachia are cut off as part of pruning, these parts of the plant serve as top cuttings for propagation. The procedure is no different from the shoot cuttings.
Stem cuttings
A bare stem is not nice to look at and has to go. Nevertheless, it is far too good to be disposed of in the compost heap. When divided into pieces, the trunk provides an abundance of vital cuttings. This is how it works:
- a stem cutting has at least 2 sleeping eyes
- A sleeping eye can be seen as a slight bump on the bark
- fill a cultivation pot with moistened, lean soil
- Insert half of a stem cutting horizontally, with the leaf nodes facing up
In the indoor greenhouse at a constant 25 °C, the first delicate leaves sprout within 6 weeks. During this time, cuttings and substrate should not dry out. Regular ventilation effectively prevents the formation of mold.
Kindel
If you were lucky enough to experience a blooming Dieffenbachia, there is a good chance you will use the most uncomplicated method of propagation. The next time the decorative foliage plant is repotted, small offshoots, also called kindles, can be discovered in the root area. These are completely self-sufficient plants in mini format. Cut the young ones with a knife and plant them in small flower pots.
Conclusion of the editors
The Dieffenbachia transforms every room into a green refuge with its magnificent leaf decorations. Although the arum plant migrated to Europe from tropical regions, the requirements for planting, care and propagation are at an acceptable level. Warm temperatures, plenty of water and a regular supply of nutrients form the basis for Dieffenbachia to feel at home. The remarkable growth can easily be kept in check by regular pruning. In order to grow additional specimens, there are several approaches to choose from: shoot cuttings, top cuttings, trunk cuttings and children. The extreme toxicity must not be ignored in any work. With appropriate precautions, such as gloves and eye protection, this shortcoming is not a problem for experienced hobby gardeners. However, cultivation in the household with children or pets is not recommended.
What you should know about Dieffenbachia in brief
- The Dieffenbachia prefers a bright to partially shaded location.
- It cannot tolerate full sun. The leaves burn very easily.
- If a Diefenbachia is too dark, the leaves lose their color and are then just a smooth green.
- The plants like it warm, around 18 to 22 ºC in summer and 15 to 18 ºC in winter.
- The soil should be a mixture of crumbly peat and coniferous soil, but peat growing substrate and standard soil are also sufficient.
- Repotting takes place in spring. In summer you should water the Dieffenbachia abundantly. Use soft water that is not too cold.
- In winter, only a little is watered, just enough so that the pot ball does not dry out.
- If you water too little, the leaves get brown edges.
- If you want to do something good for your Dieffenbachia, ensure there is plenty of humidity.
- Diefenbachia doesn't like wet feet at all, so it's better to make sure that no water remains in the saucer.
- By the way, the plant likes to be watered from below instead of from above. It is then less prone to root rot and root damage.
- During the main growing season, 0.2% fertilization is applied every two weeks.
- Dieffenbachia is susceptible to spider mites, aphids and bladderfoot.
- Fungal diseases can occur if there are large differences in temperature. These can be treated with a systemic fungicide.
- At the end of winter you can treat the plant as a preventive measure with a broad-spectrum insect repellent.
- Dieffenbachia is propagated via head, stem or shoot cuttings.
- Be careful when handling a Dieffenbachia! All parts are poisonous. Leaking juice must not get into the eyes or mouth.
- It's also better to wear gardening gloves and clean yourself thoroughly afterwards.

