- Author admin caroline@plants-knowledge.com.
- Public 2023-12-17 03:39.
- Last modified 2025-01-24 12:45.
Rainwater can be directed to a central point in a controlled manner via gutters. This is usually a rainwater downpipe. In order for it to get there, an inclination must be taken into account when attaching it.
Need for a gutter slope
Straight walls, meticulously horizontally installed windows and straight roof tiles - a must for every builder. At least for visual reasons, this would also result in a gutter that is just as straight. However, this brings problems.
As is well known, standing water forms on straight levels. Water generally only moves in gutters if there is a slope. The water flows in the direction of the slope. If this inclination is missing, the following problems can arise, which should be avoided with an ideal gradient:
- increased risk of cracks and leaks
- Rainpipe access without water flow increased by leaves, etc.
- Standal water attracts mosquitoes in summer
- may develop musty smell
- Water level can rise above the edge of the gutter and overflow in place
- Pollution accumulates faster and more frequently
- Lowering the water level, a lengthy process via evaporation
- after heavy rain, high weight due to water accumulation and risk of gutters/or brackets breaking
Plastic and metal gutters
Because the most annoying and expensive consequence of a lack of slope is the shorter shelf life due to damage such as cracks and leaks, a gutter slope is not absolutely necessary for plastic products. However, all of the other negative factors mentioned above remain with plastic gutters, so it is still advisable to avoid them.
A slope is essential for metal gutter systems. Even if rust-free or extremely robust metal is used, standing/backup water can cause damage sooner or later. A gutter slope cannot therefore be avoided here.
Calculating the slope
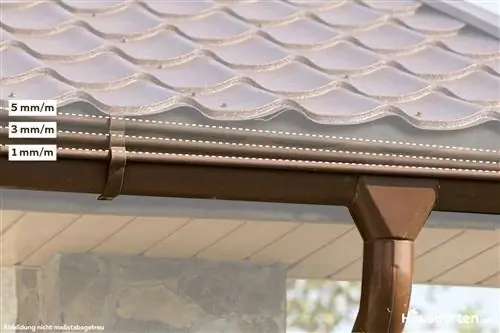
As a rule, the ideal inclination per linear meter is between 3 and 5 millimeters. Some guides give a lower value of 1 millimeter or more. This is only suitable for short gutters of a few meters, such as those found on a small garden house. On longer roofs/facades, 1 millimeter is not enough to achieve a sufficiently strong flow towards the rainwater downpipe.
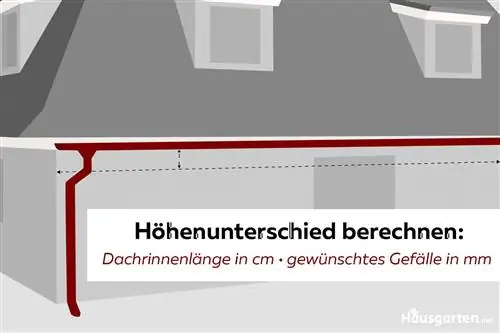
The calculation of the gradient refers to the height difference between the start and end points. The greater the angle of inclination and longer the gutter, the greater the difference in height. This can be calculated in the following way:
Gutter length in centimeters x desired gradient of 1 millimeter, 3 millimeters or 5 millimeters=height difference
For example, for a 3 meter long gutter with a 3 millimeter gradient, this results in a height difference of 9 millimeters. For a 10 meter long gutter with a 5 millimeter gradient, there is already a 5 centimeter difference in height.
Install gutter with a slope
The most difficult part comes with preparing the correct slope before installing the gutter. This requires a number of utensils:
- high ladder
- sufficiently long cord, ribbon or rope
- small nails or thumbtacks
- Spirit level
- Measuring tape or folding rule
- Pen
Procedure:
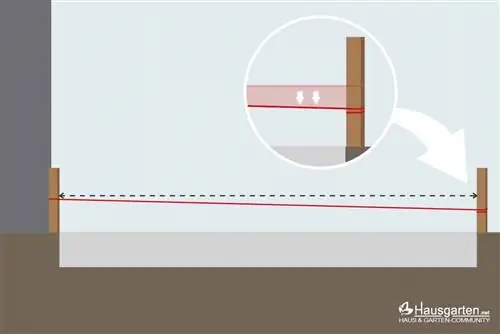
Start at the highest point of the gutter and attach the cord where the first bracket is attached. Now the tape leads to the rainwater downpipe or to the last planned bracket. Here the previously calculated height difference is taken into account and the band is set lower accordingly. The spirit level is used when it comes to attaching the special brackets for the gutters, which are placed exactly at the inclined band height. To make things easier, mark the exact attachment points with a pen.
The installation of the brackets is usually done on the rafters. Finally, the gutter is inserted and, if necessary, additional gutter overlaps or similar are integrated as an expansion device.
Tip:
Some hobby craftsmen also stretch the cord from holder to holder. This can work, but the chance of measurements being taken is significantly higher than if the line was pulled completely from one side to the other in advance with the appropriate angle of inclination/height distance.
Subsequent gutter inclination
If gutters have already been installed without an angle of inclination and there is water accumulation, this can also be corrected later. It depends on the type of brackets available. But no matter what it is, the first step, as with new installation, is to calculate the angle of inclination and stretch a string from the highest point to the lowest point at the other end, as already described above. Then it continues like this:
Adjustable Gutter Brackets:
The easiest way to correct the inclination is to use adjustable gutter brackets. They are repositioned/moved slightly downwards according to the cord height.
Rigid Gutter Brackets:
Just bending the bracket can cause a gradient. However, this method usually cannot be carried out with millimeter precision because the metal usually does not bend evenly. Nevertheless, tensioning a cord beforehand, as described above, is also an advantage here. It serves as a guide and is definitely worth a try. The only important thing is that there is no slope in the gutter path. This is why you have to proceed very carefully and then check the gradient with a spirit level and correct any increases again.
Tip:
If the brackets and gutters are older, slope correction offers an ideal time to make replacements to prevent age-related damage.

