- Author admin [email protected].
- Public 2023-12-17 03:39.
- Last modified 2025-06-01 06:48.
Whether you believe in dowsing as a functional method of exploration is up to each person. If you want to use dowsing rods, you can always make them yourself with just a few hemp strokes. We'll explain how this works and what you should pay attention to in just a few easy-to-follow steps.
From “What for” to “How”
In order to be able to build a functioning dowsing rod yourself, you should first understand how these display instruments, which are admittedly at least traditional but also often associated with esotericism, work:
Generally speaking, dowsing rods are used to display a wide variety of vibrations. The display of water veins in the ground is particularly common. Since the water itself changes the magnetic oscillations of the earth in its surroundings, it is precisely this change that can be felt and therefore displayed.
ATTENTION:
Contrary to popular belief, groundwater generally cannot be displayed using dowsing rods. This is because it normally occurs over a large area, so that there is no punctual or linear change in the electromagnetic fields. Linear water veins, on the other hand, are easy to detect.
In order for dowsing rods to be able to capture and react to these very fine vibrations that are usually not noticeable to the normal human senses, one thing is important above all. On the one hand, the material used must be flexible. Only through flexibility can even small changes be displayed. On the other hand, the material must also have a certain tension at the same time. Otherwise the vibrations will be lost in the material before they can even lead to a noticeable deflection of the rod.
A number of completely different materials are therefore generally suitable
- Wire, if stable (thick enough) and flexible (hardened)
- Flexible plastic rods
- Fresh lumber
Tip:
Did you know that willow wood in particular was and still is preferred for dowsing rods? The willow is generally considered a water indicator. In addition, even when peeled, the wood remains moist for a very long time and can therefore be used for this purpose.
Dowsing Rod Instructions
The last step before actually building your own dowsing rod is to choose a suitable model. Overall, a fairly impressive number of still well-known and, above all, used models have been preserved to this day:
- Classic Y rod
- Traditional V Rod
- Angle rod
- One-handed rod
- Pendulum as the simplest form of all dowsing rods
No matter which type of rod you choose, we will explain in simple steps how to make your project a success:
The Y-rod
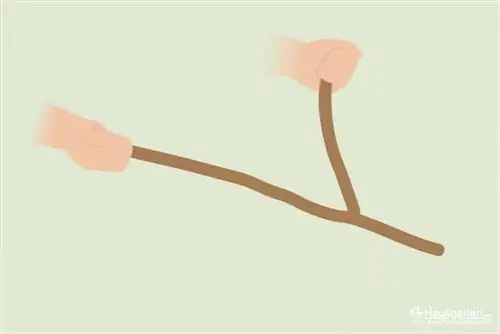
The Y-rod is the type of rod that most people probably picture when they hear the word dowsing. Usually made from a fork of a branch, it is often made by children to try out in a playful way.
Source material
- Forked branch
- Ideally fresh cut, but at least still with full wood moisture
- about as thick as a thumb
- about arm length
- Type of wood e.g. willow or hazelnut
- ALTERNATIVE: 0.5 to 1 millimeter thick round wire, about twice the arm length (e.g. old metal clothes hanger)
Wood procedure
- Short the branch so that the upper ends of the Y are approximately shoulder-width apart
- Cut the bottom end of the Y approximately the same length as the top ends
- Remove side branches and shoots flush with the branches
- Loose the shell and remove it completely
- If necessary, smooth the wood with a sharp knife or sandpaper
Alternative Metal
- Bend the wire in the middle and place the ends next to each other
- Fold both ends in the middle again and bend them apart to form a Y shape
- Twist the lower Y end so that parallel wires receive tension by twisting against each other
Handling
Let your shoulders hang loosely, place your arms against your body and bend your forearms at a right angle. Then hold the rod loosely at the upper Y ends between your thumb and forefinger. The dowsing rod should rest horizontally in the air, but be held loosely enough that it can swing and “display”. The display is made by swinging the lower Y end downwards.
The V-rod
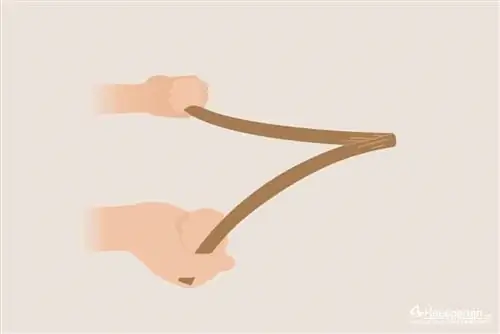
The V-rod is certainly much older than the Y-rod. It is particularly quick and easy to produce.
Source material
- Simple branch
- Branch length approximately one and a half times arm length
- Branch thickness about the thickness of a thumb
- ALTERNATIVE: 0.5 to 1 millimeter thick round wire
Wood procedure
- Free branch from side shoots
- Loosen and remove bark
- Bend the branch in the middle, but don't break it completely
- Bend branches into a V
- Twist the ends against each other until tension is built up over the twisted connecting wood fibers
Alternative Metal
Fold the wire in the middle and shape it into a V
ATTENTION:
If a V-rod is made of metal, there is often a lack of tension between the individual legs of the V. Then it can be helpful to twist the tip by one or more turns with pliers. In the end, however, this creates a kind of Y-rod held upside down with an extremely reduced lower end.
Handling
The handling of the V-rod corresponds to that of a Y-rod. Always ensure that dowsing should be done calmly and calmly. Always give yourself and the rod the opportunity to calm down. Doing your dodge too quickly or even hectically will never be successful, as the subtle vibrations will simply be masked by your normal body tension and movement.
The angle rod
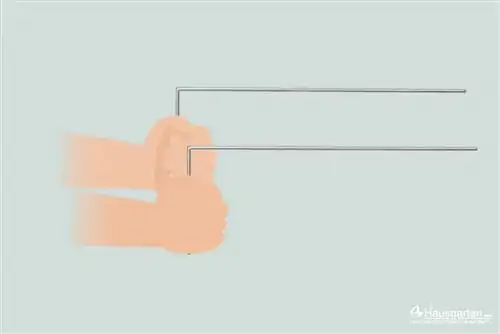
The angle rod, on the other hand, seems more modern. This is mainly due to the fact that the typical material for their production is metal.
Source material
- Metal wire, 2 pieces
- Thickness around 0.5 to 1 millimeter
Procedure
- Bend the wire 90 degrees to about the width of your palm
- Machine the second wire in the same shape
- Second end protrudes approximately 2 centimeters beyond extended index finger when held by the already cut end
Handling
The body and arm position corresponds to the Y or V rod. Align the angle rods in your hands so that the long legs point horizontally forward over the index finger. The short legs serve as a handle. Both rods point forward in parallel away from the dowser, indicating that they are moving towards each other and swinging downwards.
The one-handed rod
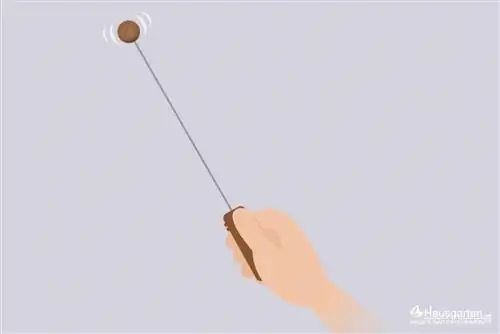
Sometimes the least known and at the same time the hardest rod to build yourself is probably the single-handed rod. Ultimately, it is an intermediate step between a real rod and a simple pendulum.
Source material
- Thin wooden stick (maximum half finger thickness)
- ALTERNATIVE: thin metal or plastic rod
- Weight, e.g. in the form of a wooden, cork or other ball
Procedure
- Debark and smooth wooden stick
- Short the rod by approx. 30 centimeters in length
- Attach the weight firmly to the front end, e.g. by attaching it to the pre-drilled hole in the ball
Handling
Hold the one-handed rod loosely in one hand, with the associated arm relaxed against the body and the forearm pointing forward at a right angle. This rod needs a lot of rest, otherwise the weight at the front end will quickly start to vibrate in the wrong way due to the operator's own movement. Short breaks are therefore best suited for the display.
NOTE:
With a single-handed rod, the right ratio of rod length, rod flexibility and weight is extremely important. A universal construction manual with specific dimensions and weight information is therefore hardly realistic.
Instead, the respective user should try out different variants to see what suits his or her instincts best. The only important thing is that the bar must not go down under the weight from the start and that the flexibility of the bar still allows it to swing easily.
The Pendulum
Lastly, the pendulum remains as the simplest and certainly most primitive form of dowsing rod. It is particularly easy to produce, as no rigid material has to be initially stable, but should still give in the event of a rash. Instead, a simple thread, cord, chain or other flexible object to which a weight of any shape is attached is sufficient. For example, a necklace with a pendant can be used as a makeshift pendulum without any effort. Detailed construction instructions are therefore omitted at this point in favor of the reader's imagination. Handling should also be easy given the basic configuration and will not be explained further here.

