- Author admin caroline@plants-knowledge.com.
- Public 2023-12-17 03:39.
- Last modified 2025-01-24 12:45.
There is a persistent rumor among amateur gardeners that boxwood should not be relocated. In fact, even professional nurseries train Buxus every 4 years so that it develops a lush fine root system. If you are thinking about moving the evergreen ornamental shrub, there are various factors to consider. The following instructions show you how to transplant or repot boxwood so that it happily takes root again - here's how to do it correctly.
The best time
Choosing the right date increases the chances of success for transplanting or repotting a Buxus many times over. Although in principle one day during the entire growing season is possible, you should give preference to these dates:
- a dry, frost-free day in March
- alternatively a day in September
Ideally, there will be neither frost nor drought on the chosen date so as not to expose the exposed roots to unnecessary strain.
Since boxwoods in hedges usually become bare from the inside, a solitary plant is particularly suitable for moving.
Preparing for transplanting

Two weeks before the actual transplanting, the course is set for the successful course of the campaign. It is important to keep both the loss of root mass and the stress on the boxwood as low as possible. A step-by-step approach is therefore recommended:
- Pick off the roots all around with the spade
- For small boxwoods with a diameter of at least 20 centimeters
- For large solitaires, the diameter corresponds to the height
- Loosen the root ball with the digging fork
- Finally, water thoroughly for 30-60 minutes
Since boxwoods are shallow-rooted, a trench about 60 centimeters deep is usually sufficient to be able to reach under the root ball later.
Transplanting
After the box was thoroughly watered once or twice over the past two weeks, it is now ready for the actual transplanting process. Here's how to do it:
- Dig a planting pit at the new location with twice the volume of the root ball
- Enrich the excavation with compost, horn shavings and primary rock powder
- Fill the pit halfway with the substrate
- Lift the boxwood out of the ground, using a winch if necessary
- Place in the middle of the planting hole
While a helping hand stabilizes the shrub upright, the remaining substrate is filled in and carefully tamped down. Afterwards, extensive watering is absolutely mandatory.
Tip:
After transplanting, a boxwood should stand exactly as deep as before. The roots and the ground are at the same height.
Cutting

Since, despite all caution, a boxwood loses part of its root mass when transplanted, adequate pruning creates the necessary compensation in the area of the above-ground shoots. To do this, shorten the bush by a maximum of a third. The best cut is from top to bottom. If the campaign takes place in September, vegetation dormancy is imminent. In this case, it is advisable to postpone pruning until the next season. Since every pruning measure encourages a bush to produce fresh shoots, a premature frost would now be fatal. The unripe branches would freeze and weaken the ornamental shrub as a whole.
Repotting
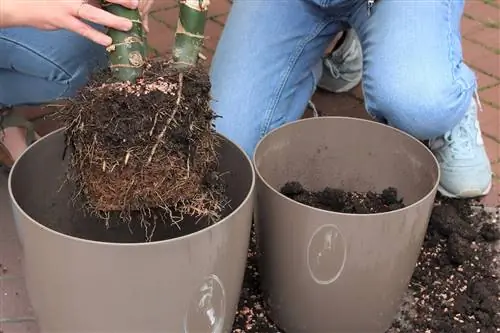
Although book trees grow at a rather leisurely pace, sooner or later their current container will become too narrow. As a result, repotting is on the agenda every 3-4 years. Ideally, you should carry out the work in early spring, shortly before new growth appears. Choose a pot that is just a few inches larger in diameter. Otherwise, after moving, the ornamental shrub will first concentrate diligently on rooting through the new planter. This enthusiasm comes at the expense of the already slow growth rate. In addition, the only option that can be considered is a bucket that has a bottom opening for water drainage. How to do it right:
- In the new planter, create a 5 cm high drainage made of potsherds, pebbles or expanded clay
- Spread a water- and air-permeable garden fleece over it to separate drainage and substrate
- Fill in a nutrient-rich, loose substrate up to half the height of the bucket
Experienced hobby gardeners take the opportunity to take a close look at a potted box tree. After the old substrate has been removed as much as possible, possible root damage can be clearly seen. Cut out rotten, stunted root strands with a sharp, disinfected knife. The root ball is then placed in a container with water until no more air bubbles appear. How to proceed:
- Position the watered boxwood in the middle of the substrate
- Fill in the remaining substrate so that a small pouring edge remains
- Press the earth down with your fist from time to time so that no cavities are created

Last but not least, water again generously so that the repotted boxwood can be moved to its location. Choose a sunny to partially shaded location. Ideally, the location is warm and protected, with a slight breeze allowing raindrops to dry quickly. This caution effectively prevents fungal infections.
Tips for care after transplanting
If you give your boxwood a little more attention after relocation, the establishment will be even more effective. To ensure that the ornamental shrub retains its lush green, dense leaves and continues to sprout, the focus is on water and nutrient supply. Water abundantly and regularly without causing waterlogging. For a boxwood transplanted in the fall, this means watering it on frost-free days in a dry winter with lots of sun and little snow. The evergreen tree is well hardy, but in this case it should still be provided with light winter protection. Cover the stressed root area with a thick layer of leaf mold, straw or compost. A Buxus happily accepts the following nutrient supply after being transplanted in spring:
- Provide with a slow-release fertilizer in April and June, specially tailored to boxwood
- Alternatively, pamper yourself with compost or cattle manure every 2 weeks from March to September
- Box in the pot is preferably fertilized with liquid or with a preparation in the form of sticks
It is important to note that mineral fertilizers are not applied to dried soil or come into contact with the foliage. Otherwise, the previously lush green leaves will lighten and fall off sooner or later. Such brightening can also be due to another cause:
It's not just the time after transplanting and repotting that you should regularly check the boxwood for light spots and green caterpillars from March to October. Both are indications of an infestation with the dreaded box tree borer. At the first signs, bold pruning can save the shrub. Therefore, pay particular attention to gray webs so that you can intervene immediately. In addition to pruning, subsequent treatment with a high-pressure cleaner is recommended as a supportive measure. To do this, spread a sheet of foil under the tree and spray with as sharp a jet of water as possible deep into the bush. If there are caterpillars in the Buxus, they will fall onto the foil and be disposed of.
Conclusion
You can transplant or repot a boxwood without any problems, as long as a few substantial premises are taken into account. Choosing the right time has an important influence on the successful outcome. If you replant the ornamental shrub in the bed in either September or March, the action will go according to plan. Spring is particularly suitable for repotting, shortly before the new shoots appear. Adequate preparation keeps stress levels at a low level. It is important to ensure adequate water supply throughout the entire procedure. If you follow these instructions, the relocated boxwood will quickly take root in the new location and larger pot and continue to thrive.


