- Author admin caroline@plants-knowledge.com.
- Public 2023-12-17 03:39.
- Last modified 2025-06-01 06:48.
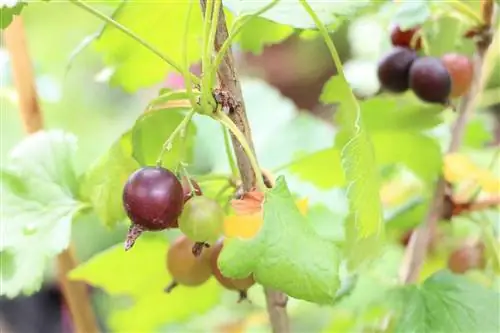
Jostaberry, a successful cross between blackcurrant and gooseberry, is very popular among gardeners. There are two main reasons for this: on the one hand, this plant is resistant to many parasites and diseases, and on the other hand, the taste of the dark, almost black berries is quite tasty. Josta is also easy to care for.
Johannisberry + Gooseberry=Josta
Jostaberry bushes have been appearing more and more often in home gardens since the late 1970s. This plant is a result of decades of breeding work when the European blackcurrant was crossed with the American Oregon gooseberry (Ribes divaricatum). As a hybrid, the breeding is very he althy and produces a rich harvest of slightly sour-tasting berries that are ideal for jams or juices. Josta does not require complicated care, but some special features of the plant must be taken into account.
Location and use
Jostaberry, like its “godparents” blackcurrant and gooseberry, needs a lot of sun to form the fruits. The undemanding shrub is also happy with a partially shaded but generally bright location. In the shade, Josta can wither and bear no fruit. This plant is not only an enrichment for the orchard, but also looks decorative. Tip: A hedge made of Josta bushes offers reliable privacy thanks to its dense growth - but only after two to three years.
Plants
There are two good times during the year to plant jostaberries. On the one hand, March-April is a good time for planting, alternatively - in October-November. When planting the Josta, the procedure is similar to that of other shrubs:
- The planting hole should be approximately twice as large as the root ball or the container with the plant and also twice as deep
- the planting hole is partially filled with prepared substrate
- the shrub is planted so that the base of the root ball can be seen
- the planting hole is filled with the substrate
- The substrate around the plant is pressed firmly so that the plant does not tip over at the first gust of wind or when watering
- then extensive watering is required
Tip:
Jostaberries are best planted at a distance of 1.5 - 2 m from each other, as the bushes grow quickly and very densely.
Pouring
When pouring the Josta, it is important to be able to find the right size. The shrub must not dry out, but it cannot tolerate waterlogging at all. It is best to water the Jostaberry with rainwater. So that the water reliably reaches the roots, a so-called watering edge - a ring of piled earth around the bush - can be set up.
Tip:
If there is hardly any snow in winter and there are longer dry periods, something should be watered even in the cold season.
Substrate
The Jostaberry prefers humus-rich, not too heavy soils. A loose substrate is important for the optimal development of this plant, as this ensures good drainage - it has already been pointed out that Josta is intolerant of waterlogging.
Tip:
Mix smaller pebbles under the substrate to loosen it up.
Fertilize
Jostaberry is considered easy to care for and experience shows that it only needs to be fertilized twice a year. It is recommended to give the plant a portion (pay attention to the exact dosage!) of berry fertilizer in March-April and to fertilize with compost in October or November, starting from approx.5 l per square meter
Tip:
Josta responds well to all nitrogen-rich fertilizers.
Care and cutting
So that the josta berry bears plenty of fruit and looks decorative even as a fully grown plant, it should be cut and thinned regularly. Diseased, dried branches can be removed at any time. Immediately after planting, moderate pruning and shaping is permitted. The optimal time to cut Josta bushes comes in autumn. Mainly old wood is removed, i.e. branches that are older than three years and no longer support. These can be recognized by the dark color of the bark
Tip:
Cut the branches to be removed as short as possible, this will make the plant he althier and there will be no unsightly bare spots in the hedge.
Propagate
The most common way to propagate Josta is from cuttings. This method requires a little more patience than with many other plants. For propagation, young shoots that are between 15 cm and 20 cm long and have several eyes are cut off in spring and placed in the growing soil - it can also be a specially prepared bed at the desired location.
Tip:
Place cuttings deep in the soil; it is enough if the upper eye is only visible about 2 cm above the surface. Cut cuttings at an angle on the underside (plant side) to make water absorption easier. Then it's time to wait, as it will most likely take several months for the cuttings to take root.
Wintering
Josta does not need any special conditions for overwintering, as the shrubs are hardy and can easily tolerate severe frost. Cuttings, on the other hand, require winter protection, otherwise the young plants risk dying. As a protective layer, e.g. E.g. straw, fleece or jute fabric.
Diseases
Among the advantages of breeding is their enviable he alth. Neither gooseberry mildew nor mites, which often attack currants, pose an acute threat to jostaberries. If you see a lot of eaten leaves, the gooseberry wasp is to blame. Before resorting to insecticides, wasp eggs and larvae can be collected from the bush. Stinging nettle manure, for example, helps against aphids. If the summer is very dry, Josta can be attacked by spider mites despite its high resistance. As a chemical-free method to effectively combat these pests, gardening professionals suggest the following: Water and spray the shrub thoroughly, then wrap it in plastic wrap and leave it for a day. Spider mites cannot tolerate moisture and die. Of course, as always, if the infestation is severe, insecticides can help.
Frequently asked questions
Is Josta suitable as a potted plant for a balcony or terrace?
Jostaberry is only suitable to a limited extent for pots, because the bushes and the root system become quite large and these plants don't look particularly attractive in the pot.
Can Josta be bred as a standard tree?
No, this is not recommended because the dense bushy growth and the weight of the fruit can cause the trunk to break and the plant to die.
What you should know about the josta berry in brief
Plants and care
- Sufficient space should be planned for a josta berry because it grows very large over time.
- If conditions are good, it can grow up to 50 cm annually and becomes correspondingly wide.
- It needs a sunny to partially shaded location and is happy with normal garden soil.
- A new plant should only be placed in the soil so far that the ball of the pot is flush with the surface of the garden soil.
- The best time for this is late autumn. To ensure a rich harvest, you can fertilize in spring with a special berry fertilizer or compost.
Fruit and harvest
Jostaberries grow in bunches like currants and taste very similar. However, they do not have the smell of currants because they lack oil glands due to the crossbreeding. They grow larger than currants, but not quite as large as gooseberries.
- Harvest time is from June to August, during this time you can pick continuously because not all the fruits ripen at the same time.
- However, jostaberries are not as easy to pick as other berries because they are not as easy to remove from the bush.
- To compensate for this, the harvest is usually larger than that of currants or gooseberries.
- Josta berries contain a lot of vitamin C, which is retained even when the berries are frozen.
- Alternatively, they can also be processed very well or, even better, eaten fresh.
Cutting
- The fruits of the josta berry form on annual and perennial wood, so such a shrub should only be pruned slightly.
- Only after the bush has been in the garden for three years should it be thinned out a little after the harvest.
- The shoots close to the ground and overhanging ones are removed.
- Later, all shoots that are older than six years should also be cut away so that a shrub consists of no more than twelve main branches.
Propagate
A josta berry can be propagated in the winter months using planters or cuttings:
- With a lowering, a long shoot of the shrub is bent towards the ground.
- The bark is cut slightly at the point where it hits the ground.
- The shoot is then covered with soil and fixed to the ground.
- After the sinker has formed its own roots, it can be separated from the mother plant and planted in another location.
Cuttings are cut from the bush and planted separately. A young shoot about 10 cm long that has a bud at the top and bottom is suitable for this. It is planted outdoors and forms its own roots through the lower bud.

