- Author admin caroline@plants-knowledge.com.
- Public 2023-12-17 03:39.
- Last modified 2025-01-24 12:45.
A hot tub, also called a hot tub, hot tub or hot tub, is used outdoors all year round, with both cold and heated water. A traditional hot tub is made of wood. People bathed like this hundreds of years ago. However, the hot tubs of that time were not equipped with an oven. The water was heated on a fire or in an oven outside the barrel and then poured into the barrel. Modern hot tubs have an integrated oven to heat the water to pleasant bathing temperatures.
Tool
If you want to build a hot tub completely yourself, you should definitely buy or borrow high-quality special tools. Because it is not so easy to mill the semicircular connections (curves and grooves) yourself so that they are really tight later. For most hobby craftsmen, a kit or at least prefabricated staves are more suitable. A bath tub is exposed to very high loads, so you should only build it yourself without a kit if you have some experience in working with wood. The staves, as the boards on barrels are called, must be incorporated precisely. Even minor errors in cutting or processing can result in the tub not being tight.
Kits
- Wooden hammer
- Hardwood board
- rubber hammer
- Screwdriver
- Cordless screwdriver
- possibly wrench for installations
Homemade with finished staves
- above tools
- Band or jigsaw for the curves
- Circular saw for shortening the slats
- Drilling machine with attachment for round hole (diameter adapted to drain)
Material
You shouldn't skimp on the material for the hot tub. Cheap staves made of inferior wood reduce the price, but may not even withstand the first bath.
Staves
The side slats on a barrel are called staves. When constructing a hot tub, pay attention to sufficient wall thickness, both in the staves and in the material for the floor. Only use types of wood that can withstand water without painting, such as Siberian larch. This is a very hard type of wood that is weather-resistant due to its high resin content. Wood that is too soft or materials with lots of knotholes are completely unsuitable for building a hot tub, as every single knothole represents a possible weak point. The following are well suited:
- Spruce
- Oak
- Larch
- Precious woods
Good wood is difficult to obtain and relatively expensive. Since the staves have to be fitted precisely with curves, their production is time-consuming for do-it-yourselfers and is not possible without special tools. In order for the barrel to be rounded at all, a groove must be incorporated into one side of the stave and a corresponding semicircular rounding on the other side. This allows the staves to be screwed against each other to achieve the exact radius of the barrel. To connect the staves to the floor, a groove about 10 cm high is milled into the thickness of the floor boards, about two centimeters deep.
Hoops
In order for the individual staves to be held together, hoops are necessary. These are placed around the barrel like a belt and must hold all the tension that presses on the walls from the inside. Since the hoops have to withstand a considerable amount of weight, they should be relatively wide and made of stainless material. Hoops must never be attached to the wood itself, otherwise cracks will occur in the staves.
Material requirements
Depending on the width, around 50 staves are required for a diameter of around two meters. When purchasing, make sure that the barrel staves already have a groove milled for the base.
- Sides: logs/barrel staves (thickness 45, width at least 145 mm, length 1 m), end to the side with curve and round groove, transverse groove about 10 cm high (depth approx. 2 cm, width depending on floor thickness)
- Floor: Logs with tongue and groove, thickness according to groove width in the stave (e.g. 45 mm)
- Larch smooth edge board for the substructure: 35 x 55 x 2100 mm
- Wooden boards for the crossbars on the floor (approx. 25 x 140 x 3000 mm)
- 2-3 metal tension straps with lock for hot tubs
For barrels with a diameter of 2 meters or more, three tension straps should be used to secure them. The third tension ring is fixed in the middle of the staves.
Preparations: Secure the base
Depending on its size, a hot tub filled with water can weigh several hundred kilograms. Therefore, it requires a stable, load-bearing and level installation surface. The following are particularly suitable for this:
- gravel
- gravel
- Paving stones
Grass areas or normal garden soil are less suitable. Depending on the local conditions, drainage may also be necessary. A platform or even a foundation is not absolutely necessary. The only important thing is that the hot tub is stable and the air can circulate. The water must be able to flow easily under the hot tub so that there is no permanent moisture there. In addition, the substructure should have a very slight incline so that the water can drain easily from the tub. If you use screws for assembly, use stainless steel screws, as other versions may rust.
Instructions
The easiest way is to build a hot tub yourself using a kit. Depending on the model, a kit contains all the necessary parts and components for a hot tub. Remember not to store the kit for too long or in the sun before assembling it. Wood is a living material that works and can warp. In this case it may happen that the bin is no longer completely tight.
Make barrel base
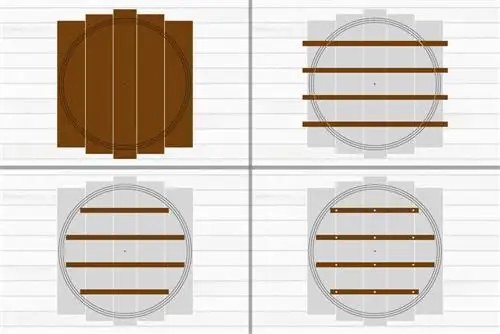
First the bottom of the hot tub is put together. Like the side walls, the base is not screwed, but rather simply put together using a tongue and groove construction. When putting them together, make sure to use boards that are as wide as possible at the edge. Measure the center of the floor and mark it. The desired outside diameter can be recorded using a compass board. Additionally, draw a circle 10 mm in front of and behind this dimension. The assembled floor boards are now fixed using a tension belt.
Subfloor construction
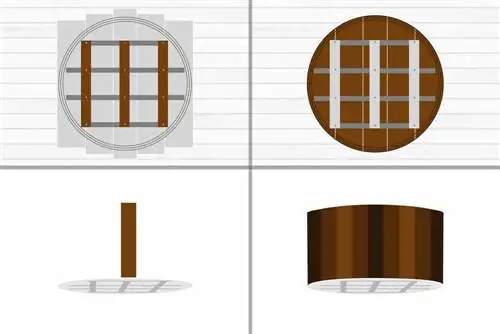
So that the floor does not sit flat on the surface but ensures good ventilation, a substructure is made. To do this, place the subfloor boards (25 mm thick) across the floor boards at a distance of around 40 to 50 cm and trace the inside of the three circles on them using the compass (or a self-made version made from a board with drilled holes). The boards are then shortened to the correct length.
In order to connect the smooth-edged boards (35 mm thick) upright with the sub-floor boards to form a T, drill holes in the sub-floor boards every 30 cm in advance. Use stainless steel screws for the screw connection. Place the screwed construction with the wide side down across the boards on the base plate and screw it tight. Care should be taken to ensure that the screws reach a maximum of half of the base plate and are always attached crosswise.
Only now the base plate is sawn off at the outer marking using a band saw or jigsaw. The space between the subfloor construction (2 cm) is required for attaching the barrel staves. Pay attention to precision so that the staves can be inserted precisely. Finally, the excess is removed with a plane so that the edges are nice and smooth.
Insert flow
There must be or must be a hole in the bottom into which a plug will later be placed to drain the water. So that the remaining water can completely drain out of the hot tub, this hole should ideally be on the side and later positioned at the lowest point on the surface.
Install side walls
First stave
Staves for the side parts of the barrel are available in different lengths and can be used for both round and oval barrels. The semicircular connections cannot be used at any angle to one another, so you should ask in advance or check what the minimum diameter of the barrel must be.
The staves have a groove at the bottom so that you can easily hit them on the ground. It's best to just use the heel of your hand to adjust. The first stave is placed on the front side of the longest floor board. If the staves are difficult to insert, you can also use a wooden hammer. In this case, however, you should put a hardwood board underneath to avoid unsightly dents. Drive in the staves, but not too hard, so that there is still a little room for maneuver.
Install more staves
The other staves are now fitted directly next to the first stave. Each stave must be close to the previous one. Before a new stave is hammered in, you should check whether the first boards are still in place or have possibly shifted. A correction is now possible without any problems. In addition, about every fifth stave is marked on the outside where the underside of the floor is.
Last stave
When installing the last stave, the penultimate stave is turned slightly outwards and the curve is fitted into the groove. Subsequent pressing inwards brings the last two staves into position.
Attach tension rings
Before attaching the tension rings, the staves should be pre-fixed with two tension straps about 30 cm from the edges. To ensure that the clamping ring sits at the same height all around, we have drawn a mark in advance, over which the clamping rings can now be attached and slowly screwed tighter. It is still possible to make slight corrections to the boards by carefully hitting the clamping ring and thus the staves all around with a rubber mallet. The same procedure is used in the middle and at the top edge with a tension ring. The upper tension ring should be the same distance from the edge as the lower one.
Insert the oven
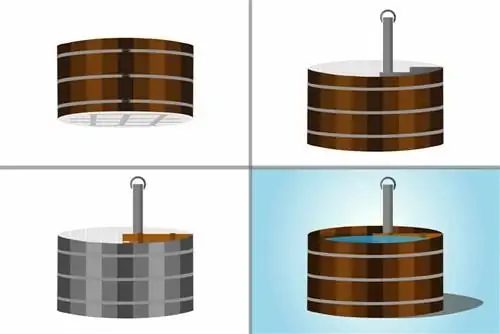
The oven is mounted directly on the drain opening, but must not cover it. Ovens with feet can be placed directly on the bottom of the barrel. However, many oven variants are intended for wall mounting. In this case, place the oven on two square pieces of wood on the edge of the hot tub so that it does not come into direct contact with the ground. Then pre-drill the holes for the screw connections with a drill. M8 carriage bolts made of stainless steel with rubber washers are best suited for fastening. These screws have a round head on the outside and are tightened with a nut on the inside.
Assemble interior furnishings
It makes sense to install some kind of slatted frame in front of the oven so that you don't accidentally burn yourself. As a rule, the ovens already contain a device to which this slatted frame can be attached. If you want to install a bench, you should build it slightly more than semicircular. This means the bench is stable without having to be attached to the wall.
Check for leaks
If the wood is dry, the hot tub will probably always lose water. This is completely normal. In order for the tub to seal, the wood must first swell. To do this, close the drain hole and let in lukewarm water up to a filling level of around 20 cm. After a while the staves became full of water and expanded. Since the tub will leak again if it dries out, there should always be some water left in it. If the barrel is tight, you can fill it with water and start the oven. Please always follow the manufacturer's instructions.

