- Author admin caroline@plants-knowledge.com.
- Public 2023-12-17 03:39.
- Last modified 2025-06-01 06:48.
The craft of basket weaving is many thousands of years old. Unfortunately, there is hardly anyone left who has mastered this craft. That's a shame, because a home-woven basket is always an eye-catcher and, above all, can be used in a variety of ways. In addition, it usually costs significantly less than a purchased one. The only thing you have to invest in a homemade basket is time and not too much. Once you get the hang of it, weaving baskets goes very quickly.
Red cane or willow are suitable materials for weaving baskets. Before attempting the basket weaving adventure, we recommend visiting the craft store to gather all the materials you need. You need a base plate, which can be round, oval or square and which you can easily make yourself, and wicker cane. The tools also include a drill, pliers and a knitting needle. You also need a container with water.
How to make a basket - step by step instructions
First, prepare the bottom of the basket. To do this, take the base plate and drill an odd number of holes in it. Now you have to determine the number of wicker tubes required for these holes. To do this, count the holes and divide this number by 2, then round up the result. The number you get indicates how much wicker you have to cut.
Before you can start processing the wicker, it must be made flexible with water. For this reason you need the container with water mentioned above. You insert the wicker tube into this. If it is sufficiently moistened, take out the required number for the base plate and guide the cane through the holes from below in such a way that loops are created. The last one is inserted into the hole as described, but then braided through the loops to secure the remaining wicker tubes.
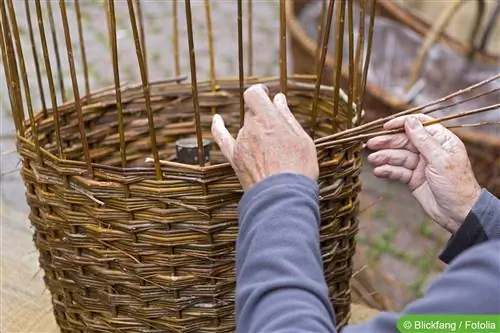
This means that nothing can slip out here. The wicker must be the same height all around. Now it’s time for the actual basket weaving. You can start anywhere. Now you alternately place the wicker cane around the upright wicker canes from the front and from the back. After each stroke you should press down on your braid to create a tight braid. At the end of the round you place the wicker opposite to the beginning, so you started at the front and moved to the back or turned around.
The wicker is not cut off, but used up to its end. Then you take a new wicker cane. At the end of the wicker tube, the rest must be laid inside. With the new wicker cane you start a little before the end of the previous cane. The end of the old pipe and the beginning of the new pipe should overlap.
Once you have reached the intended height of your basket, the protruding ends of the raised wicker canes are moistened very well with water. The ends are finally inserted into the adjacent braid. You can use a knitting needle to make this work a lot easier. Now the basket is ready and can be used.
The fascination of basket weaving
Basket weaving is a very nice hobby. It is suitable for all generations and baskets are actually always needed. A home-made basket is wonderful as a gift, for example. There are a variety of possibilities.
You can weave a bread basket or Easter baskets or fruit baskets. Baskets are practical and welcome in every household. Basket weaving is particularly recommended as family craft fun. You don't have to prepare much for it and the braiding itself isn't too much of a challenge either. Anyone can learn the technique without any problem.


